Screenshots use Indian Rupee (INR) as the example currency. All currency symbols in the text above update to match your Allot settings automatically. The app works identically in any currency — only the symbol and formatting differ.
IN THIS GUIDE
- What is Allot?
- First Run Setup
- The Budget View
- Recording Transactions
- The Accounts View
- Importing Bank Statements (CSV)
- Reports
- Managing Categories & Groups
- Recurring Transactions
- Moving Money Between Categories
- Backup & Restore
- Cloud Sync
- Privacy & Data Security
- Free vs Premium
- Activating a License Key
- Best Practices Using Allot on Your Phone
1 · What is Allot?
Allot is a personal budget tracker that runs entirely inside your browser. Every rupee, pound, or dollar you record stays in your device's local storage — nothing is sent to a server unencrypted, and no account is required. After the initial page load, no internet connection is needed for budgeting. Cloud Sync is the only feature that requires a connection, and it is opt-in.
Allot follows the envelope budgeting method: each month, you decide in advance how much money goes into each spending category. As you record transactions, the "Available" balance in each category goes down. When a category hits zero, you've spent your envelope for that area — and you consciously decide whether to move money from another category or cut back.
💡 The core idea in one sentence
Every rupee you earn gets assigned to a category before you spend it, so you always know exactly where your money is going and how much you have left in each area of your life.
Key concepts
- Ready to Assign — Income you've received but not yet allocated to any category. Keep this at ₹0.00 by assigning all income to categories each month.
- Budgeted — The amount you've planned to spend in a category this month.
- Spent — Actual transactions recorded against the category.
- Available — Budgeted minus Spent. Green means under budget; red means overspent. Unspent amounts carry forward to the next month.
See it in action
2 · First Run Setup
When you open Allot for the first time, a quick onboarding wizard walks you through choosing your currency and creating your first account, picking the spending areas you care about, and entering your monthly income. This takes about 60 seconds.
Step 1 — Choose your currency
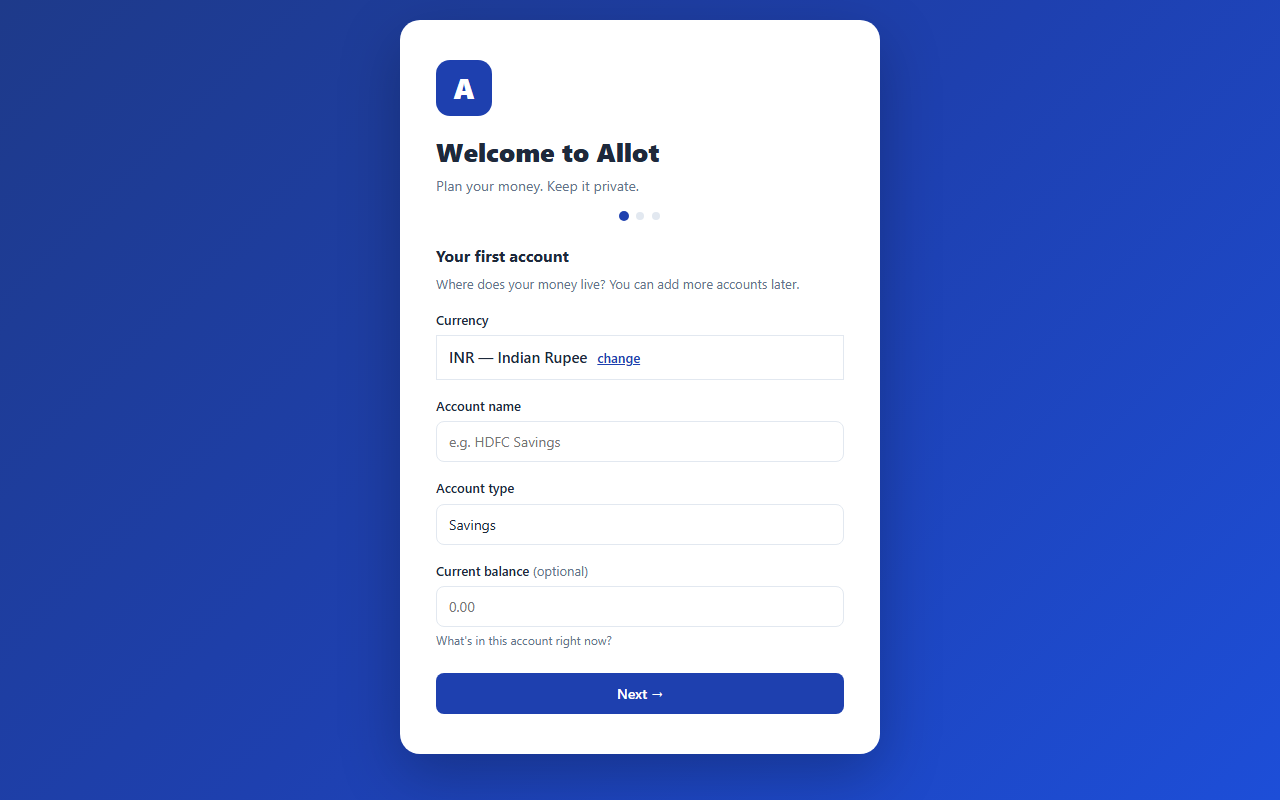
Open Allot
Navigate to the app URL. You'll see the welcome card with a list of common currencies already visible.
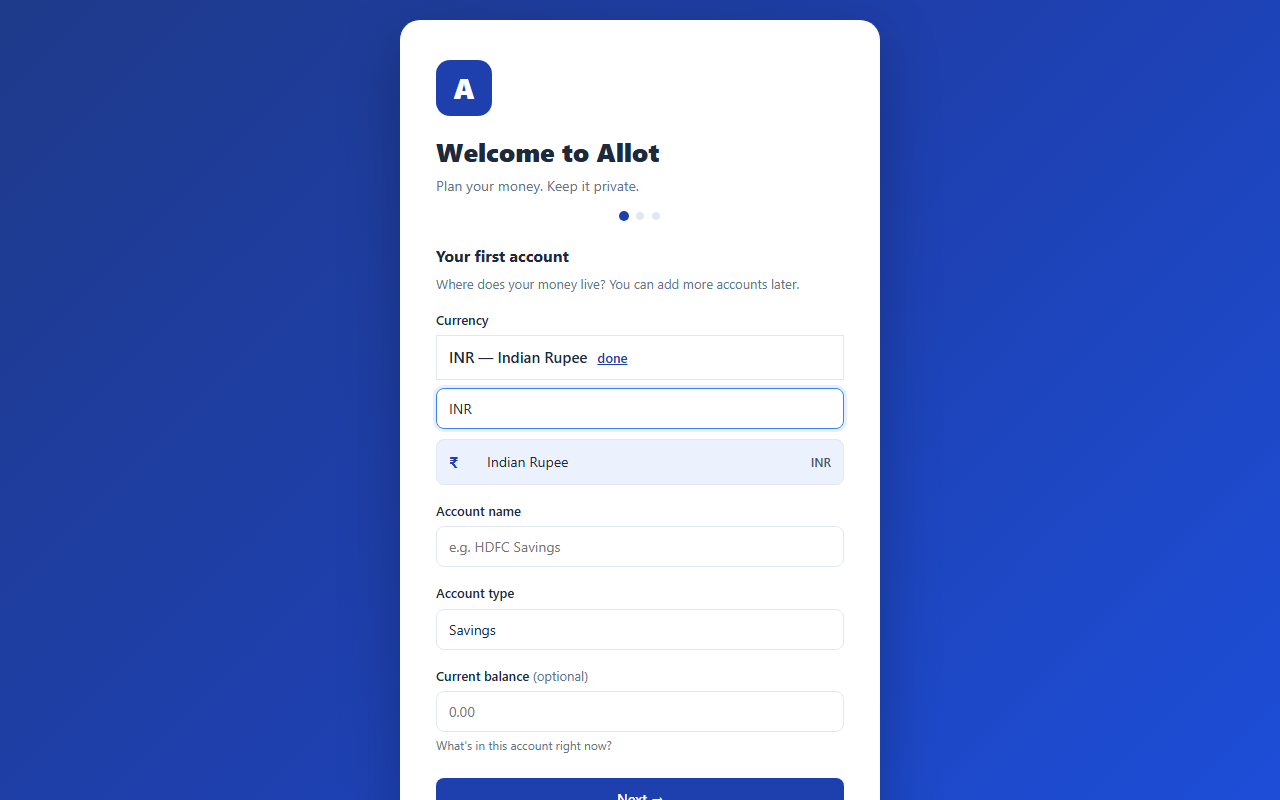
Search for your currency
Type in the search box — by name ("Indian Rupee") or code ("INR"). The list filters instantly. Click your currency to select it (it highlights in blue).
Click Next
The step dots at the top show you're on step 1 of 2. Click Next to proceed to account creation.
Step 2 — Create your first account
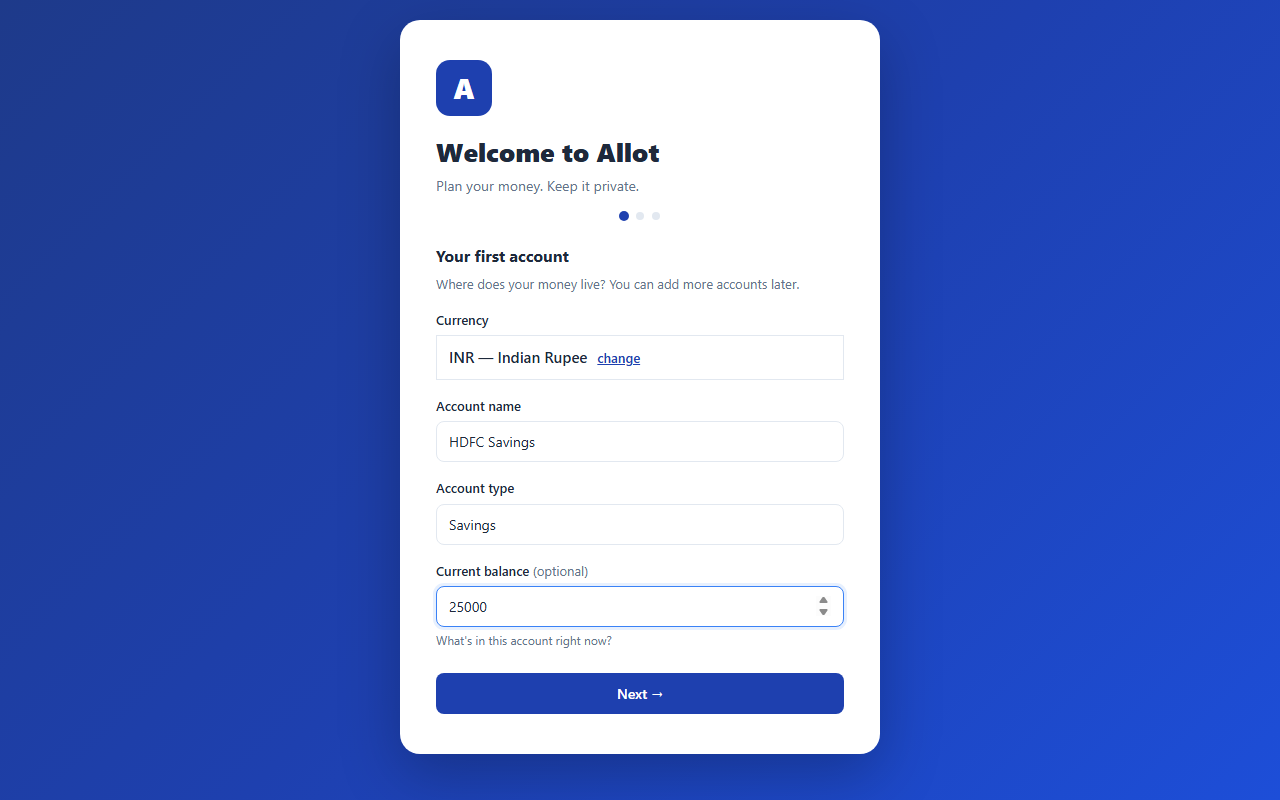
Name your account
Use a recognisable name — "HDFC Savings", "Wallet", "Axis Current Account". This is what you'll see in the Accounts view.
Choose account type
Checking/Current or Savings — standard bank accounts. Credit Card — balance shows as "owed" in red. Cash — for physical wallet. Investment — for tracking portfolios.
Enter your opening balance
Check your bank app right now and enter the current balance. This is the starting point — every transaction you add adjusts this figure going forward.
Click Finish
Allot creates your account and loads the Budget view with your starter categories pre-populated. You can add more accounts later from the menu (⋮).
Starter categories are pre-loaded for you. Allot seeds common Indian household categories — Income Sources, Housing, Food, Transport, Utilities, and Personal. You can rename, delete, or add to these at any time.
Keyboard shortcuts
3 · The Budget View
The Budget view is your financial command centre. It shows every category, how much you've budgeted for the month, how much you've spent, and how much remains. Use the < > arrows at the top to navigate between months.
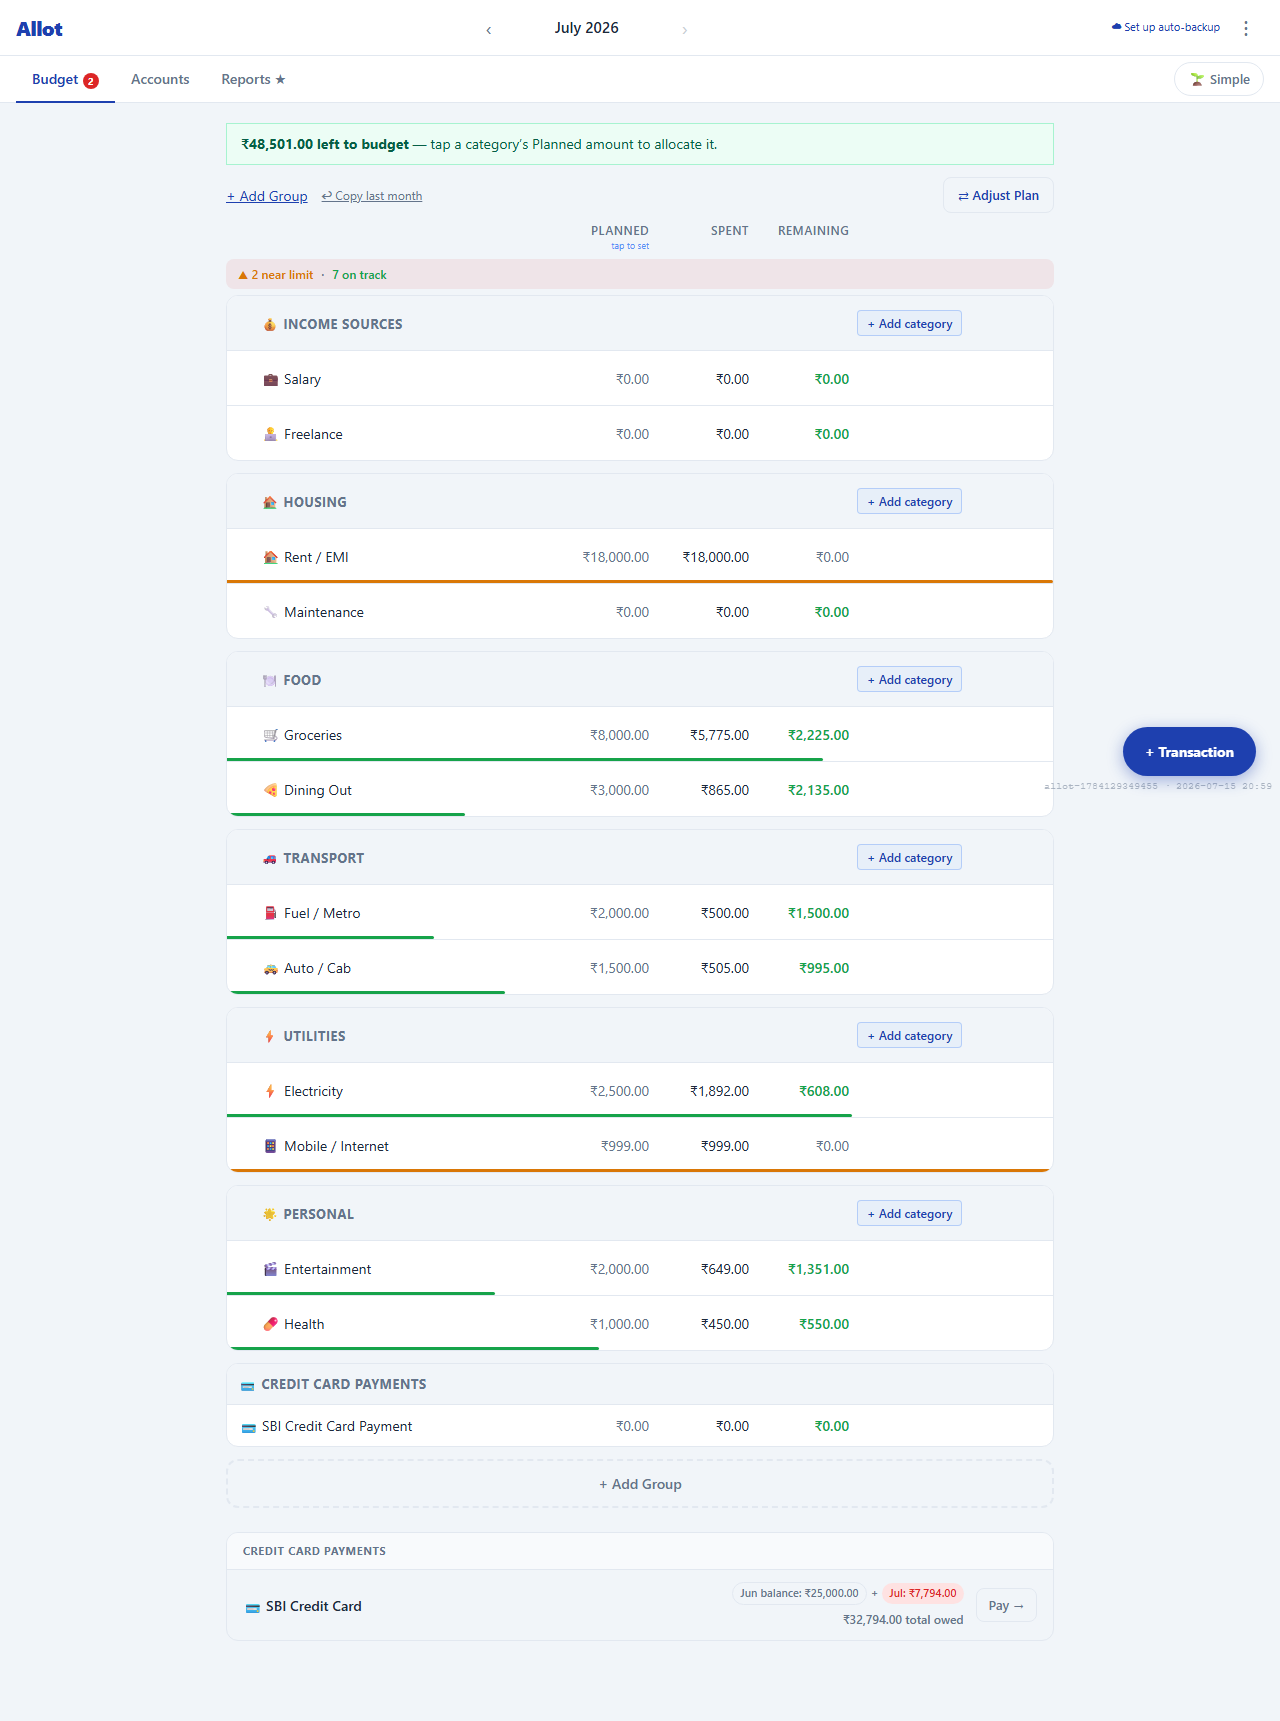
The header bar

- Month navigator — click ‹ / › to move between months. Free users see only the current month.
- Ready to Assign — unbudgeted income. Every rupee you earn should be assigned to a category. Click the badge to see the breakdown.
- ⋮ Menu — access accounts, backup, export, recurring transactions, settings, and upgrade options. Preferences (date format, rollover, group subtotals), Restore, and Help & Guide live under ⚙ Settings.
- 🌱 Simple — a toggle at the right of the tab row. Switches between the full envelope table (the default) and a single Safe to spend number. See below.
- + Transaction (FAB) — the floating blue button at the bottom-right. Always available for quick transaction entry.
Reading the category table
Each category row has three columns:
| Column | What it means | Colour meaning |
|---|---|---|
| Budgeted | The amount you planned to spend this month. Click to edit inline. | Blue underline = editable |
| Spent | Total of all expense transactions in this category this month. | Always dark text |
| Available | Budgeted − Spent + carryover from previous month. | Green = positive, Red = overspent, Grey = zero |
Setting a category budget
Click any amount in the Budgeted column to edit it inline. An input field appears — type the new amount and press Enter to save, or Esc to cancel.
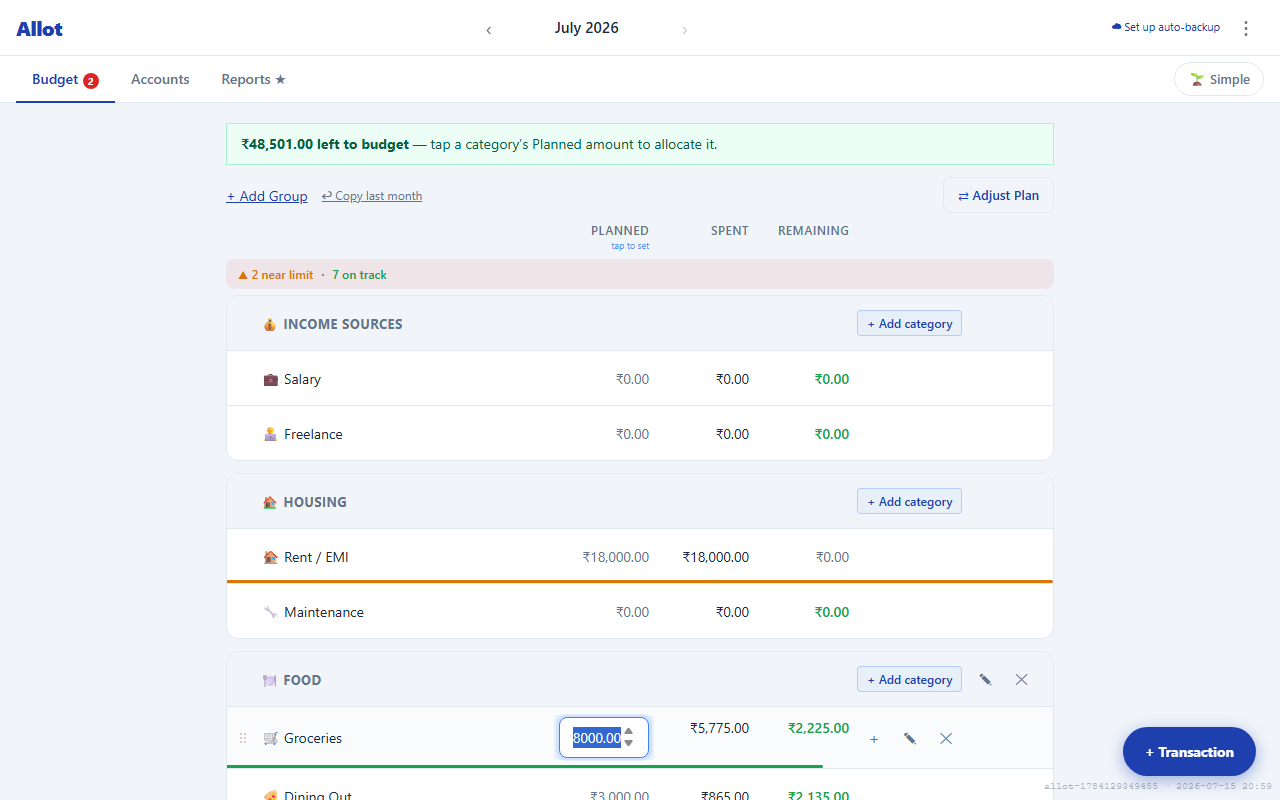
Budget after payday, not before. Wait until you've received your salary for the month, then assign it all in one sitting. Start with non-negotiables (rent, EMIs, utilities), then food, then discretionary spending.
Carryover
If you don't spend your full budget in a category, the leftover amount automatically carries forward as a bonus balance for the following month. A small sub-line shows how much carried over (e.g. +₹450 from May). Overspending carries forward as a negative balance, meaning next month starts with a deficit in that category.
Simple view — "Safe to spend"
Tap the 🌱 Simple toggle in the tab row to swap the Planned / Spent / Remaining table for a single headline number: Safe to spend this month. It answers the one question the table makes you calculate — "how much can I actually spend right now?"
The number is your remaining budget across all categories, and it holds back bills still due later this month from your recurring schedules, so it reflects money you can genuinely spend without shorting an upcoming payment. Below the hero number, each category shows a plain "₹X left / over / all used ✓" line with a mini status bar; tap a card to drill into that category's transactions, or use its + button for a quick add.
Three things are held back from the number, each shown on its own line beneath it: bills still due later this month, your credit card payment due this month, and anything sitting in a savings category.
Savings categories
Tick Treat as savings when adding or editing a category (see §8 Managing Categories & Groups) to mark it as money you are deliberately parking — an emergency fund, a holiday pot, a new phone. Its whole balance — this month's planned amount plus everything carried over from earlier months — is subtracted from Safe to spend and shown as "− ₹X set aside in savings". Without this, a year of carried-over emergency fund reads as money you are free to spend today.
Savings categories are marked with a small savings tag in the envelope table, and their card in Simple view reads "₹X saved" instead of "left". The Emergency Fund category created during onboarding is flagged for you; untick the box any time to hand the money back to Safe to spend. Overspending a savings category still counts against you in full.
The toggle is remembered per device. The full envelope table remains the default and is unchanged for power users — switch back any time with the same toggle.
Set your plan in the table, live in Simple. Use the envelope table once a month to assign your income, then flip to Simple for day-to-day "can I afford this?" checks.
4 · Recording Transactions
Every time you spend or receive money, record it in Allot. Transactions update both your account balance and your category spending in real time.
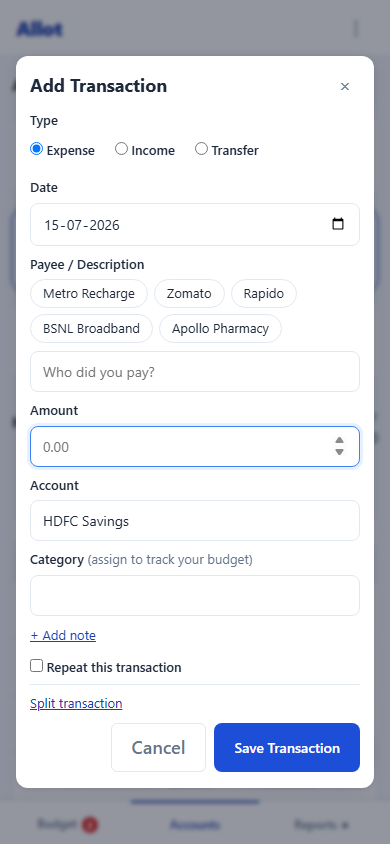
Click the + Transaction button (the floating button, bottom-right of any view) to open the Add Transaction modal.
Adding an expense
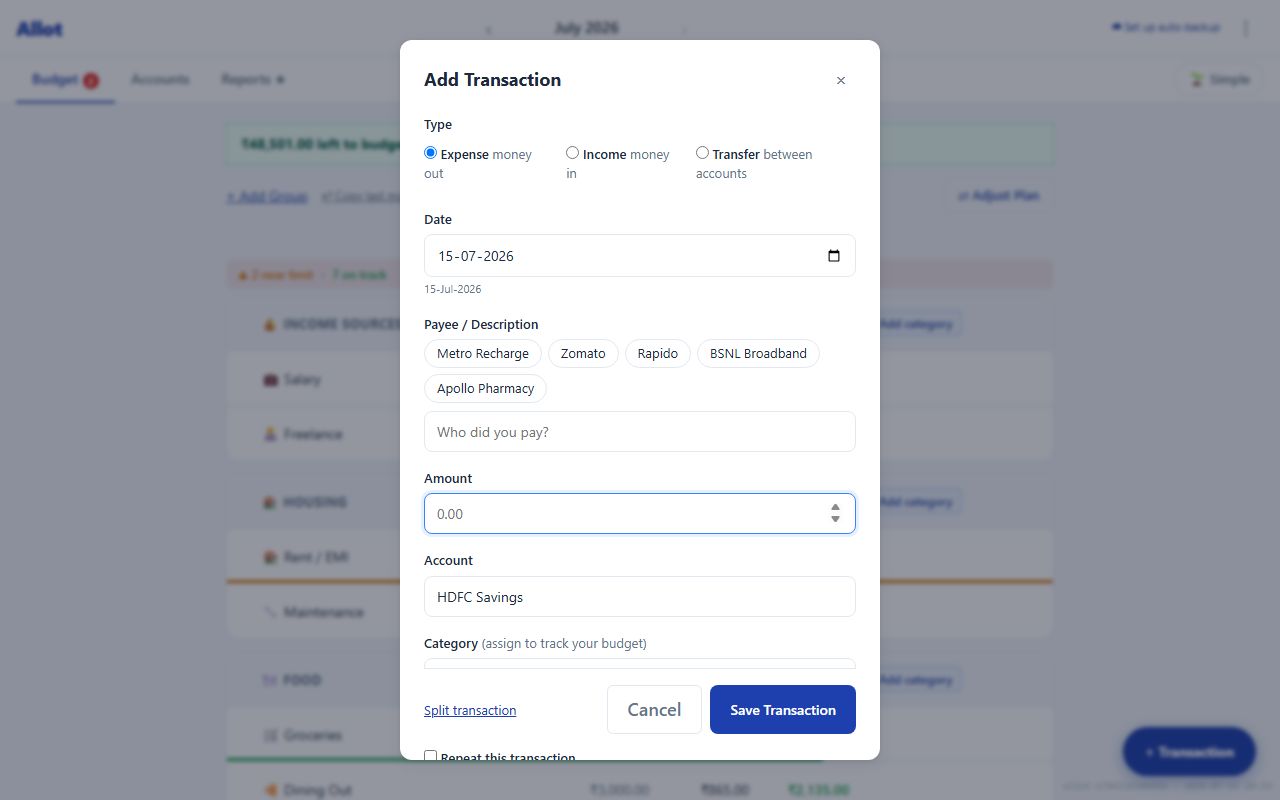
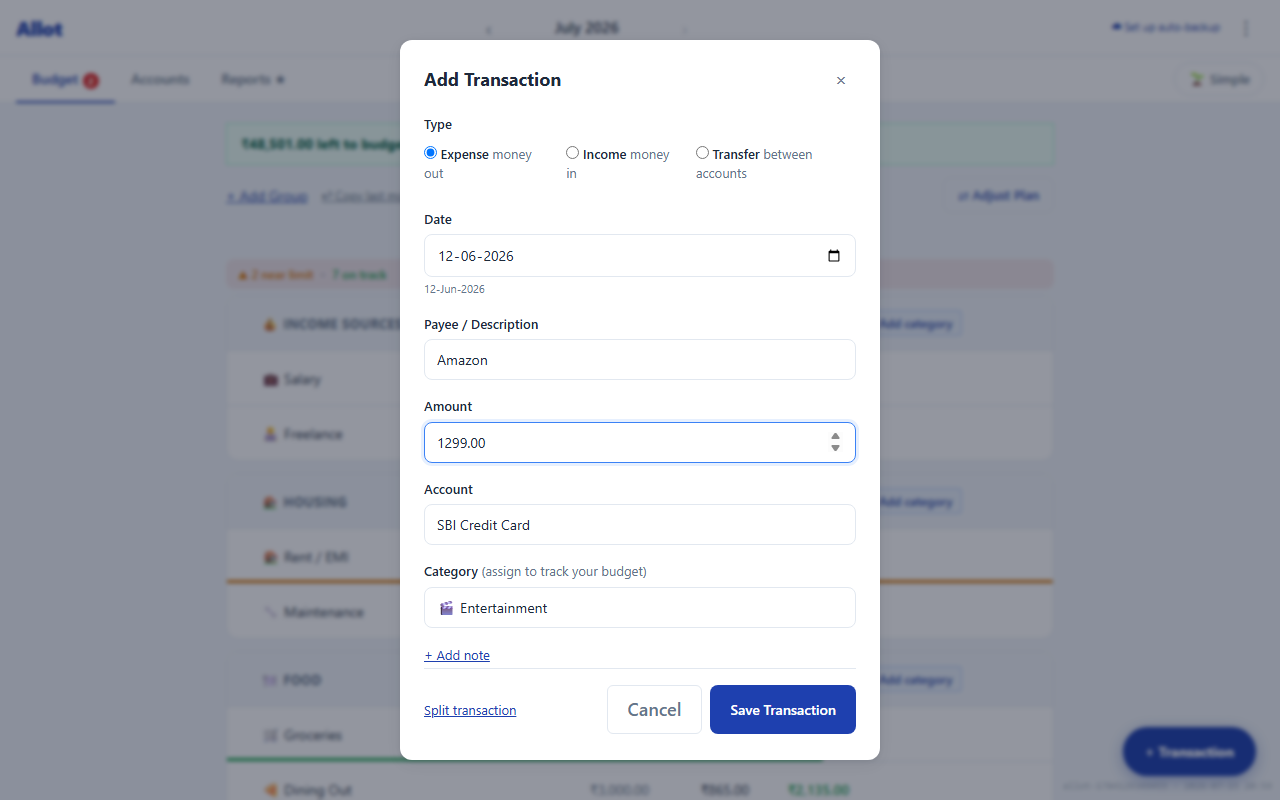
Select type: Expense
Expense is the default. Use it for anything where money leaves an account — shopping, bills, dining, subscriptions.
Enter the date
Defaults to today. Change it to match the actual transaction date on your bank statement — this matters for month-based reporting.
Enter the Payee / Description
Type the name of the merchant or description — "Swiggy", "Electricity Bill", "BigBasket". Allot remembers which category you used for each payee and auto-fills it next time.
Enter the amount
Always enter a positive number — Allot knows it's an expense from the Type you selected. ₹1,299 becomes −₹1,299 in your account automatically.
Choose the account
Select which account the money came from — your savings account, credit card, or cash wallet.
Assign a category
Select which budget category this belongs to. This is how spending is tracked against your budget. If the payee was seen before, it auto-fills the last-used category.
Add a memo (optional)
A short note for your own reference — "birthday dinner", "Kindle book", "monthly recharge".
Click Save
The transaction is saved and the Budget view updates instantly. The category's Spent amount increases and Available decreases.
Adding income
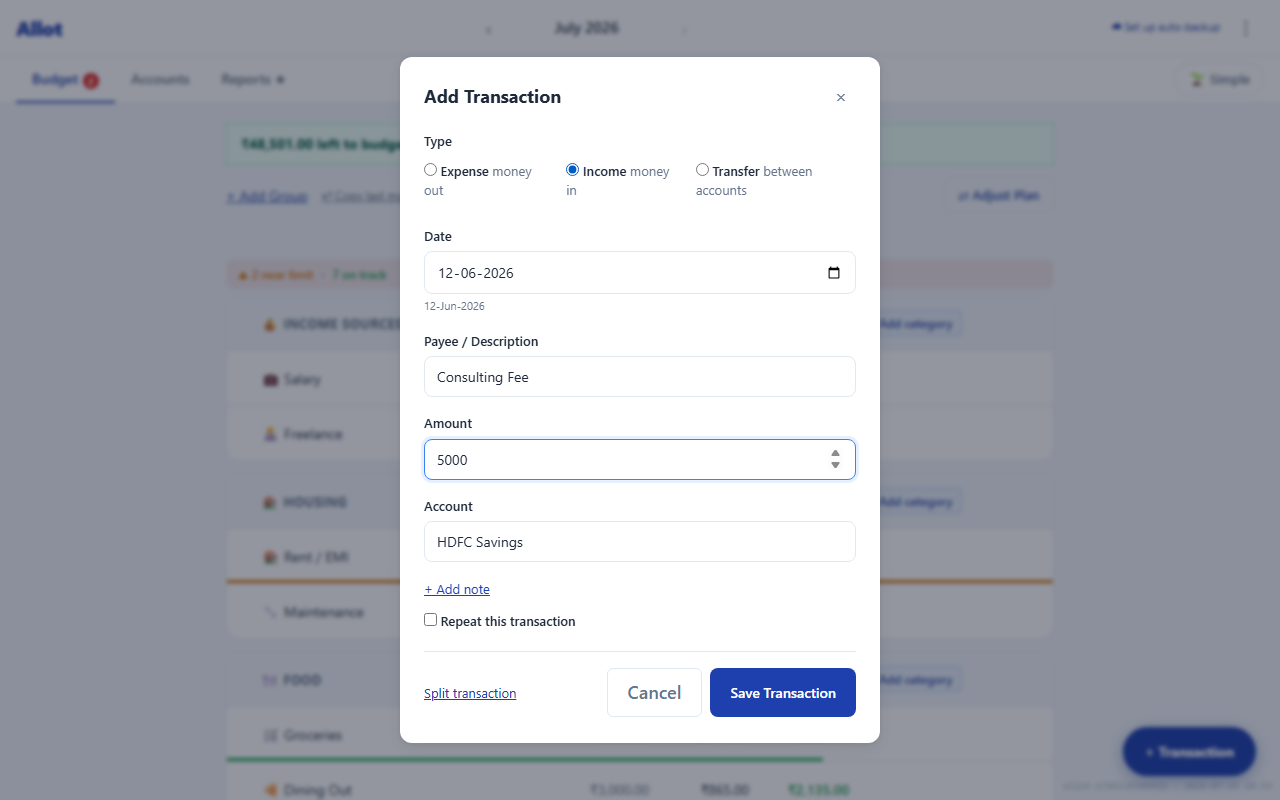
Select Income at the top of the modal. The Category field is hidden — income goes into your "Ready to Assign" pot, which you then distribute to budget categories. This keeps the separation between money in and money allocated clean.
After recording income, go to the Budget view. Your "Ready to Assign" badge will show the new amount. Assign it all to categories before it sits idle.
Transfers between accounts
Select Transfer to move money between two accounts — for example, paying off your credit card from your savings account, or moving cash to your wallet. Both accounts update atomically: the source decreases, the destination increases. Transfers do not affect any budget category.
Split transactions
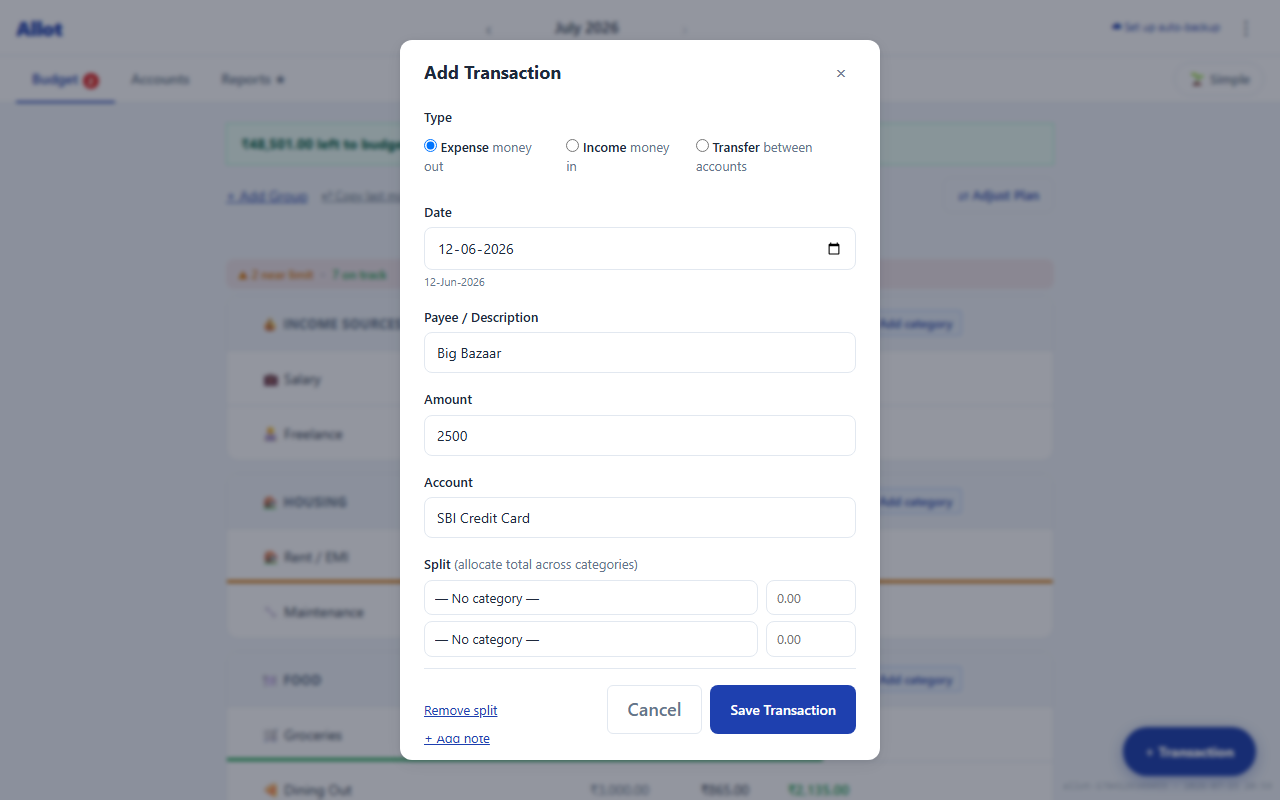
Click Split transaction (link below the Memo field) to divide a single transaction across multiple categories. Enter the payee and total amount, then assign portions to different categories. The running total at the bottom shows how much is still unassigned.
Example: A ₹2,500 D-Mart bill split as ₹1,800 → Groceries and ₹700 → Household Supplies.
Recurring transactions
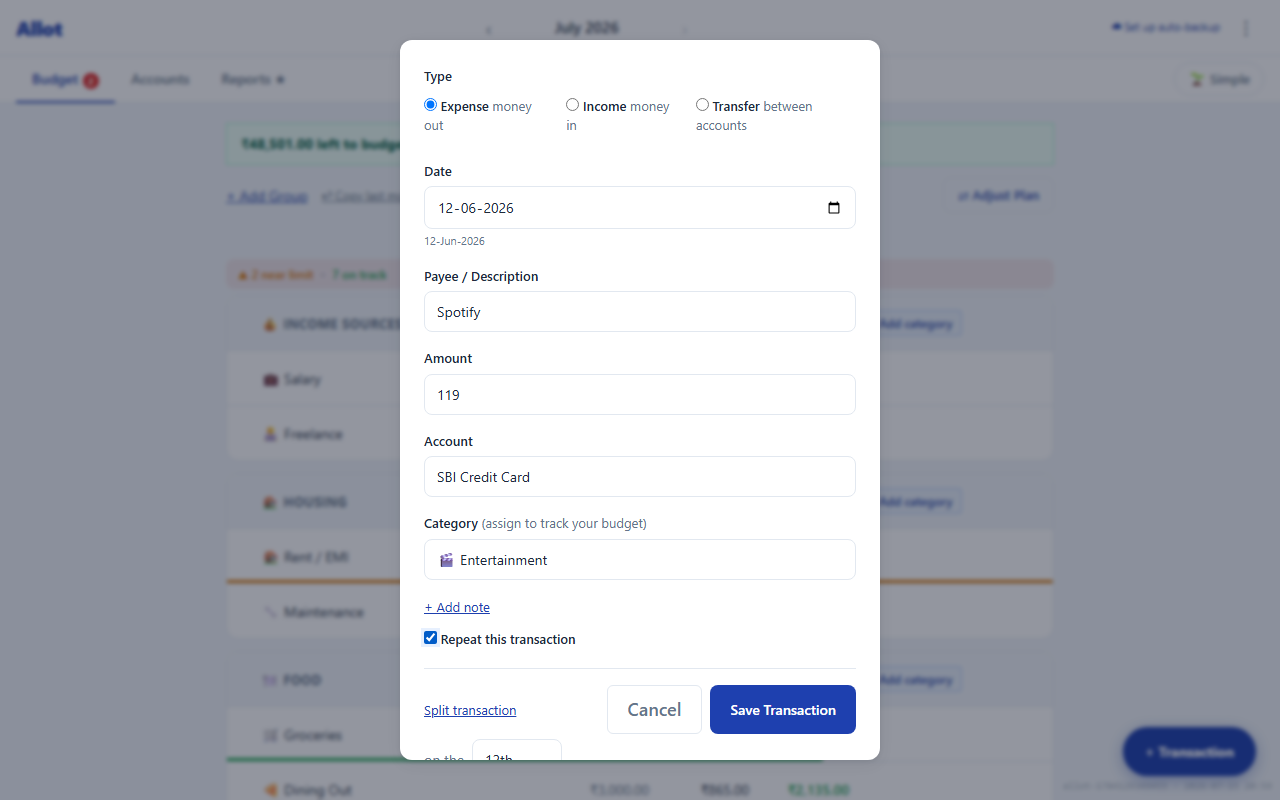
Check Repeat this transaction on any expense or income to create a recurring template. Options:
- Monthly — choose the day of the month (1st–28th). Allot clamps to the last day of shorter months.
- Weekly — choose the day of the week.
Each time you open Allot, it checks for overdue recurring entries and generates them automatically. A toast notification tells you how many entries were added. Manage all recurring templates from Menu → Recurring Transactions.
5 · The Accounts View
Click Accounts in the navigation bar to see all your accounts and their transactions. The view is split into two panels: account list on the left, transaction list on the right.
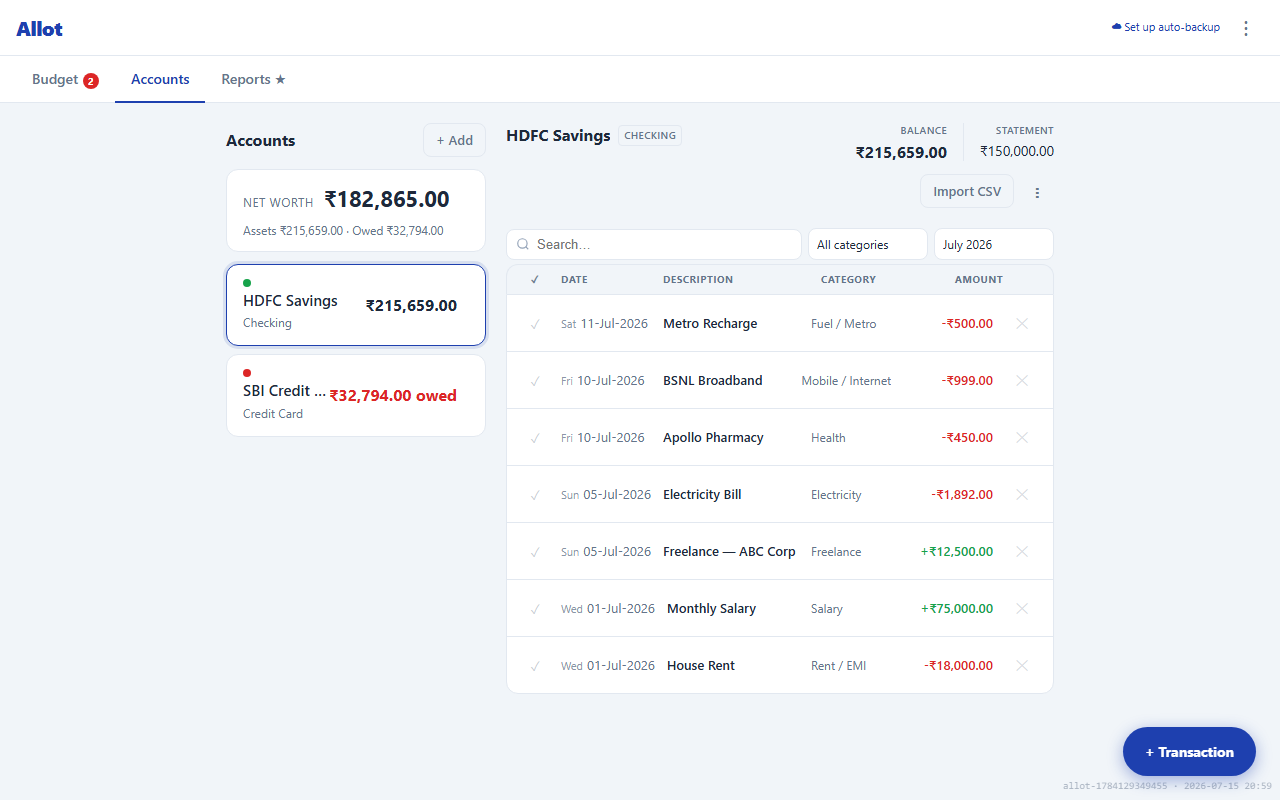
Account balances
- Checking/Savings — shows current balance (opening balance + all transactions).
- Credit Card — shows "₹X owed" in red. This is how much you owe the bank, not how much you've spent from budget.
Credit card accounts
When you set an account's type to Credit Card, four extra fields appear (all optional). They tune how Allot tracks the card and drive the utilisation and spending-cap indicators in the Accounts view:
| Field | What it does |
|---|---|
| Last 4 digits | Used to auto-match SMS transaction alerts to this card. |
| Statement Date | The day of the month (1–28) your statement closes. Allot uses it to measure charges over your real statement cycle rather than the calendar month. |
| Credit Limit | Your card's total limit. Allot shows a utilisation bar (percentage of the limit owed) and warns as you approach it. |
| Spending Cap | An optional self-imposed ceiling. Allot alerts you when your charges in the current statement cycle — the one you are spending into right now, shown as a date range on the bar — cross this amount. Useful for staying well under the limit. The bar always reports the live cycle, so it does not change when you scroll the Budget to another month. |
These settings sync across your devices. Edit the statement date, credit limit, or spending cap on one device and, with Cloud Sync on (§12), the change follows the card everywhere — the most recent edit wins.
Transaction list
Each row shows: date, payee, category, and amount. Income is green; expenses are red. The header shows the total account balance and an Import CSV button (Premium).
Reconciling — the ✓ column and the Statement figure
The register header shows two numbers, and they are meant to differ:
- Balance — everything you have recorded, including transactions your bank has not posted yet.
- Statement — your opening balance plus only the rows you have ticked in the ✓ column. This is what your bank should be showing you right now.
Open your bank or card app, and tick ✓ on every row that also appears there. Ticked rows dim. Leave anything still pending un-ticked. When the two figures match, a green ✓ Reconciled badge appears — and if they don't match, something is wrong in Allot: a missing transaction, a duplicate, or a wrong amount. That gap is the whole point of the number.
Ticking a month of rows one at a time is no fun, so the ⋮ menu in the register header has ✓ Mark cleared through…. Give it the closing date of the statement you just checked and every transaction on or before that date is ticked at once. It never un-ticks anything dated later — un-ticking stays a per-row action so a mistyped date can't undo your work.
Working with a credit card
Cards need a different habit from bank accounts, for one reason: what you pay and what the card bills you are often different numbers. Type a purchase in from memory and, when the statement arrives, you have two records of one purchase that no longer look alike.
The classic trap — fuel. You fill up for ₹3,471.90 and enter that. The bank bills pump price plus a 1% fuel surcharge plus GST on that surcharge, so the statement says ₹3,512.86 and credits the surcharge back on a separate line. Restaurants add a tip after you sign. Foreign purchases carry a markup. Each one leaves your figure and the bank's figure a little apart.
Allot treats amounts within 2% of each other as the same purchase when the payee and date line up, so the fuel case above is caught and flagged rather than imported twice. A tip-sized gap is deliberately left alone — 5–10% is wide enough that matching on it would start pairing up genuinely separate purchases.
The routine that keeps a card straight
- Don't type card purchases in by hand. Let the statement be the record. Everything you enter manually is a reconciliation problem waiting for month-end.
- Import the statement once per cycle using Import statement in the register (§6).
- Record the bill payment as a Transfer — savings → card, not an expense (§4). The importer spots payment rows on the statement and leaves them unticked, so the card is not credited twice.
- Reconcile in the same sitting. Use ✓ Mark cleared through… with the statement's closing date, then check that Statement equals the Total Amount Due printed on the bill. A ₹40 surcharge gap is easy to find in one cycle and painful to find after six.
- Let one device do the importing. With Cloud Sync on (§12), two devices importing the same statement independently produce two sets of rows that merge into duplicates. Nothing can un-pick that for you afterwards.
- Cash and UPI are still entered by hand — just against the account that really paid, not against the card.
Splitting a purchase across categories? Use Split transaction (§4), not several rows. One supermarket bill entered as three separate transactions looks like three separate purchases, so when the statement's single line arrives nothing matches it and the trip gets counted twice. A split stays one transaction with one amount — the statement matches it, and each part still lands in its own category.
One boundary to know about: Statement Date is the day your cycle closes, and that day belongs to the statement it closes. Enter the date exactly as your bank prints it — a statement headed 6 August covers the 7th of July through the 6th of August, so you enter 6. Your bank lists the date you made a purchase but bills by the date it posted, which can be a day or two later, so a charge made on the closing day itself may land on either statement. If your Statement figure is close but not exact, check the transactions dated on the closing day first.
Editing a transaction
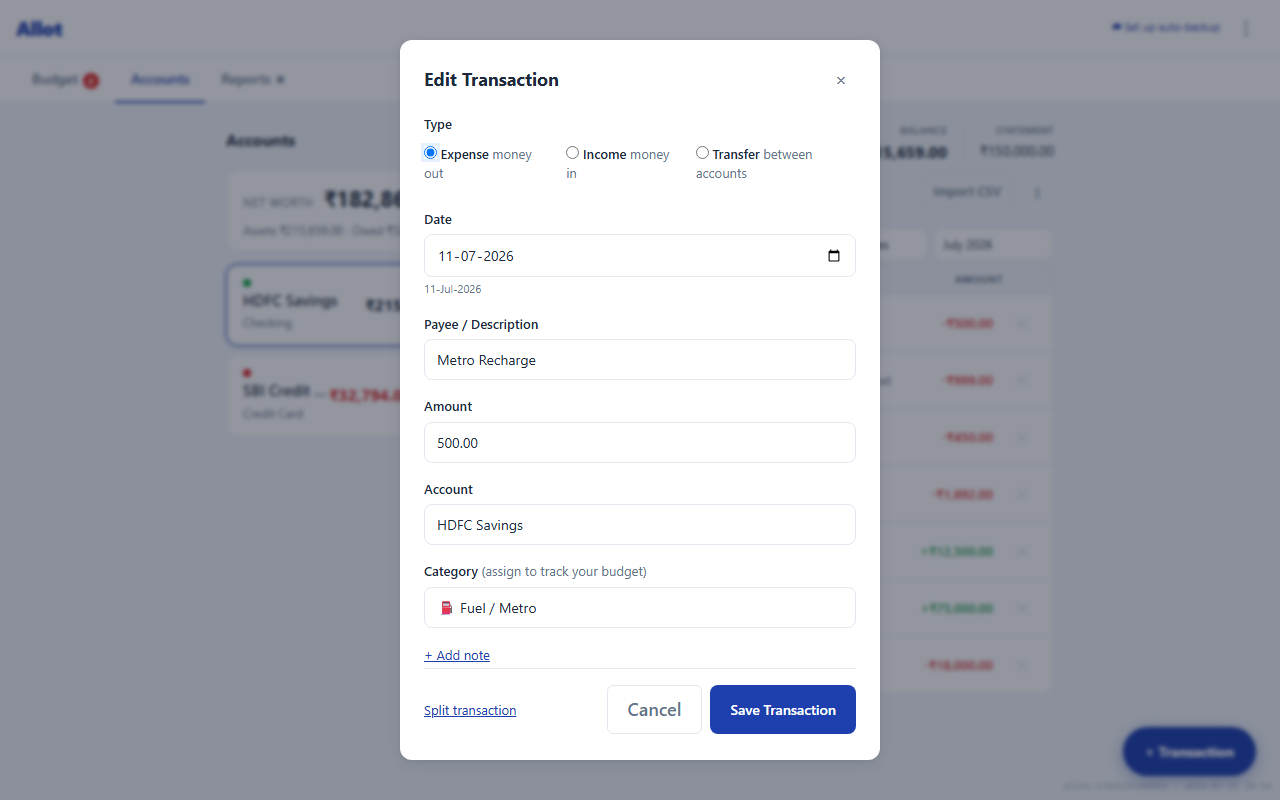
Click any row in the transaction list to open it in the edit modal. Change any field and click Save. To delete a transaction, click the × button on the row (visible on hover) or use the Delete button in the edit modal.
Adding another account
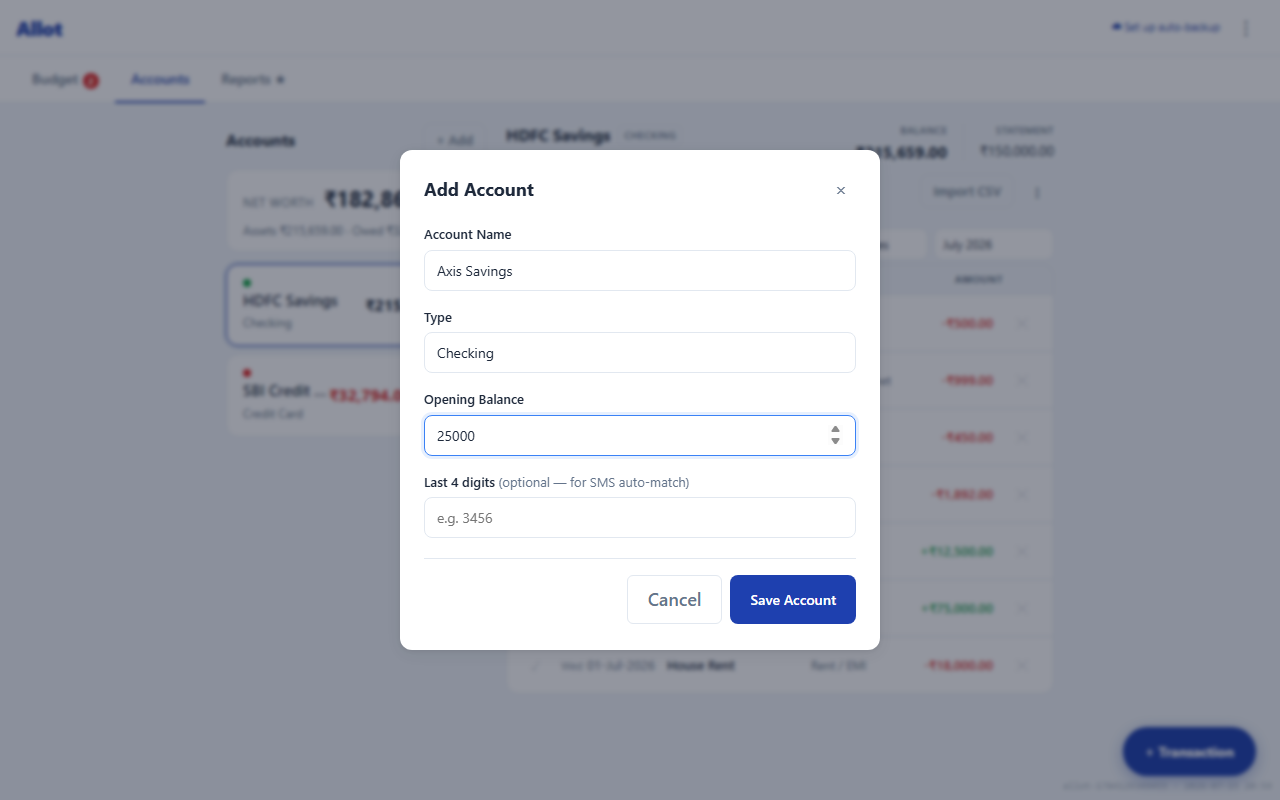
Click + Add in the Accounts panel header. Fill in the account name, type, and current balance. You can add as many accounts as you need — Premium users have no limit; Free users can have one account.
6 · Importing Bank Statements (CSV) ★ Premium
Instead of typing every transaction manually, download your bank statement as a CSV file and import it in bulk. Allot's import wizard handles different column layouts and date formats automatically.
Step 1 — Download your bank statement
Log in to your bank's internet banking portal and export a statement for the relevant period. Look for "Download Statement" or "Export to CSV/Excel". Save the file somewhere accessible.
Most Indian banks (HDFC, ICICI, SBI, Axis) offer CSV export. If your bank only exports to Excel (.xlsx), open it in Excel or Google Sheets and save as CSV.
Step 2 — Open the import wizard
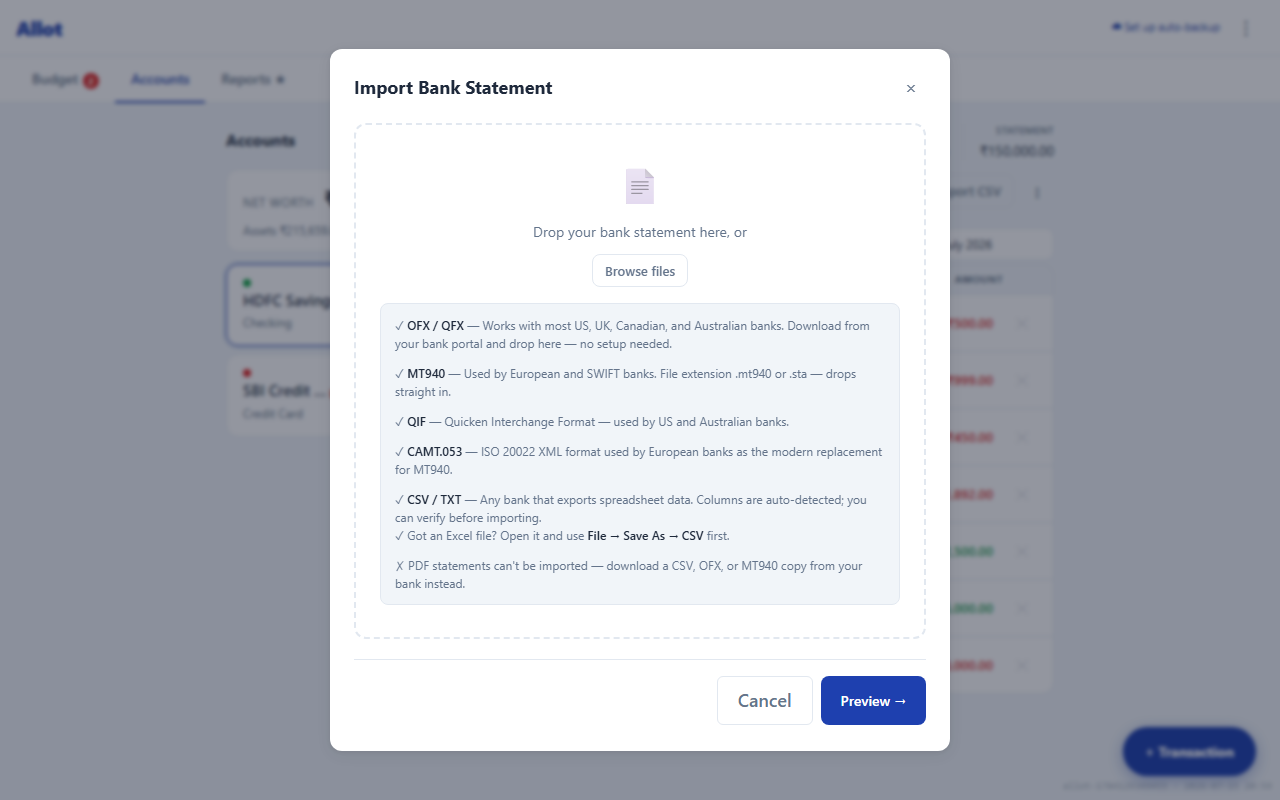
In the Accounts view, click Import CSV in the transaction list header. The import wizard opens. Drag your CSV file into the upload zone or click Browse files.
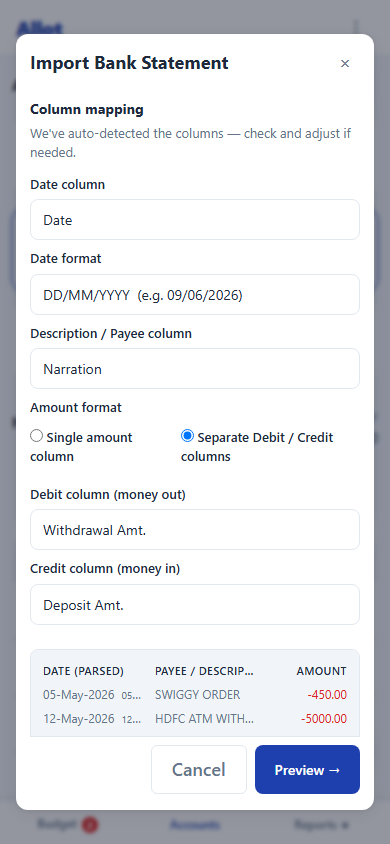
Step 3 — Map your columns
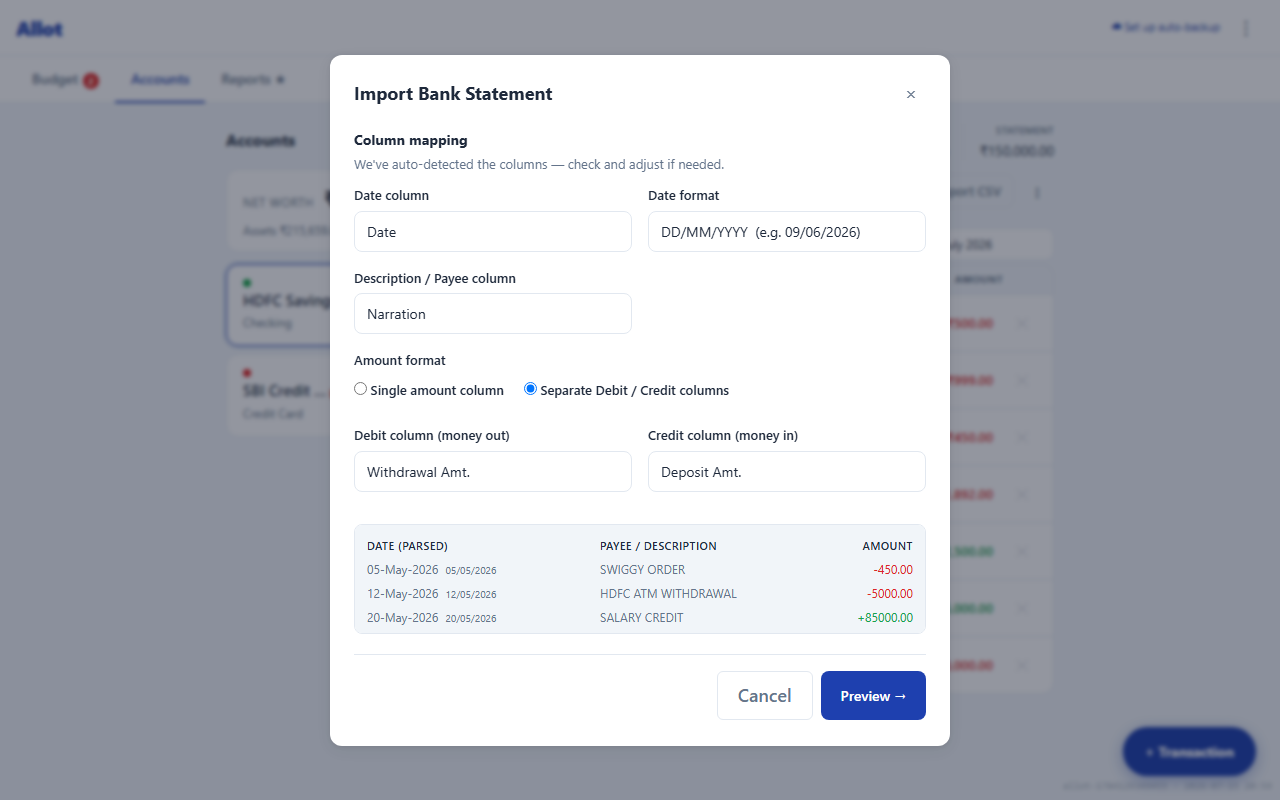
Allot shows the first few rows of your file. Use the dropdowns to tell it which column contains:
- Date — the transaction date column
- Description / Payee — merchant name or narration
- Amount — the transaction value (or separate Debit / Credit columns)
Select the date format used in your file (DD/MM/YYYY, MM/DD/YYYY, etc.). Allot auto-detects the most common formats from your bank.
Step 4 — Review and confirm
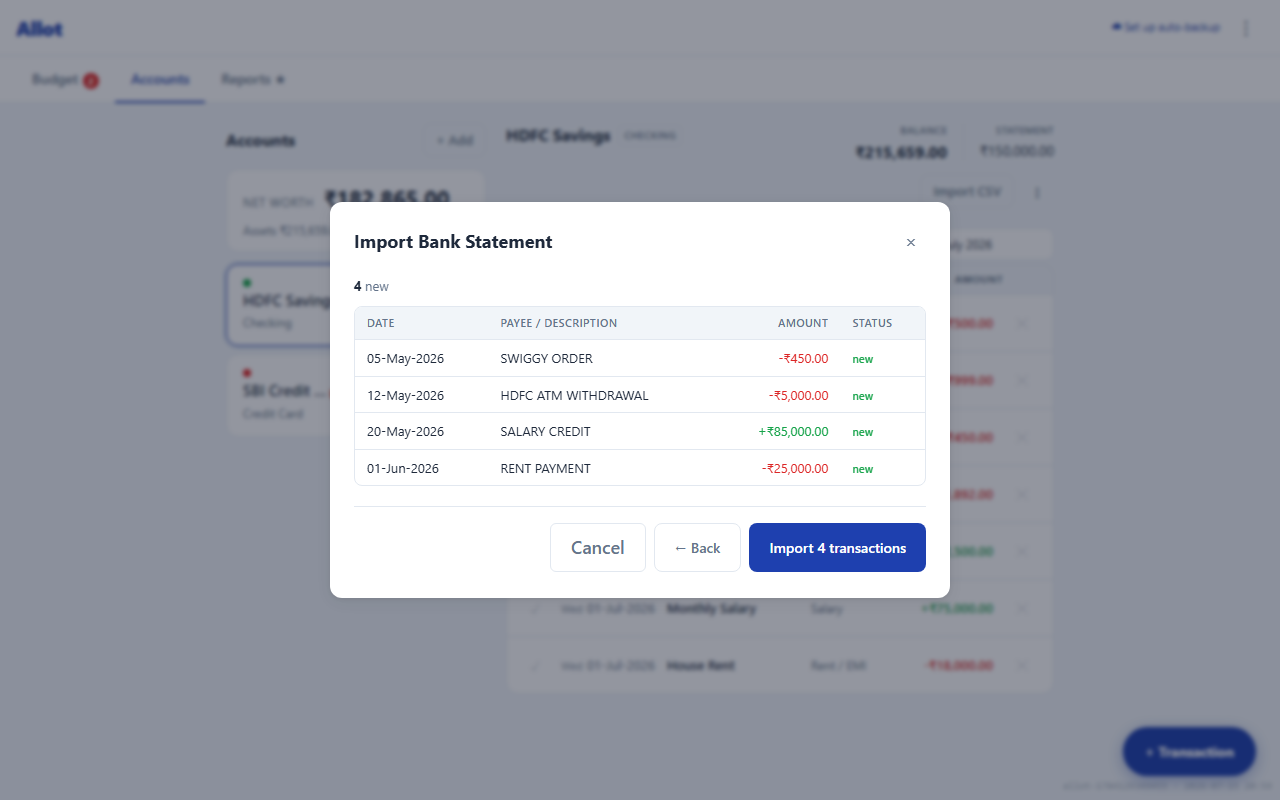
The preview shows every parsed row with a status. Only rows marked new import on their own — everything else arrives with an unticked force import box, so nothing lands in your account without you agreeing to it:
| Status | What it means |
|---|---|
| new | Nothing in the account resembles this row. Imports automatically. |
| duplicate | Same date, amount and payee as a row you already have. Skipped silently. |
| date-fix | Same payee and amount within a week. Allot corrects the existing row's date instead of importing a second copy. |
| possible dup | Close enough to an existing row to be the same purchase — same day and amount, or a similar payee with an amount within 2%. Tick to import anyway. |
| already split | Several rows you entered by hand on that day add up to this one line. Tick only if it really is a separate purchase. |
| 💳 payment | A payment toward this card. You have almost certainly recorded it already as a transfer from your bank account, so it stays unticked — see §5. |
A stored transaction can only excuse one incoming row. If your card was genuinely charged the same amount twice on the same day, the first row is flagged as a possible duplicate and the second is correctly treated as new.
Click Import to save. The account balance and budget categories update immediately.
Imported rows come from the bank's own statement, so they arrive already ticked in the ✓ column and count toward the Statement figure (see §5). If your export includes pending transactions the bank has not posted yet, untick "Mark these as cleared" below the preview before importing.
Credit Card accounts: Many card exports list charges as positive numbers. When Allot sees that — and there is no Dr/Cr column telling it otherwise — it ticks "Positive = expense (invert signs)" on the mapping step so charges are stored as money out. Check that box in the preview if your charges appear as income, or untick it if refunds and charges have come out the wrong way round.
Importing a statement that spans multiple months
Bank statements often cover 3–6 months. Allot handles this correctly — each transaction is filed into the month its date belongs to, so a transaction from April lands in April, one from May lands in May, and so on. Duplicate detection works across all months too, so re-importing an overlapping statement won't create double entries.
After the import completes, the app stays on the current month. Navigate back using the ‹ arrow in the Budget view to see each historical month's spending.
Budget allocations for past months are not created automatically. The spending figures will be accurate, but the Budgeted column for those months will show ₹0.00 until you fill them in. This makes the "Available" column show large negative numbers — that's not overspending, it just means no budget was set for that month. You can safely ignore past months if you only want historical transaction records, or navigate to each month and set budgets if you want accurate Available figures.
Import tips: Work oldest-to-newest (January → February → March) and use a separate import per account. Assign categories in bulk during the preview step — it's faster than editing one by one. Starting fresh with 3 months of history? Import all three months first (5 minutes), then set rough budgets for each past month — your Reports chart will show a meaningful trend immediately.
7 · Reports ★ Premium
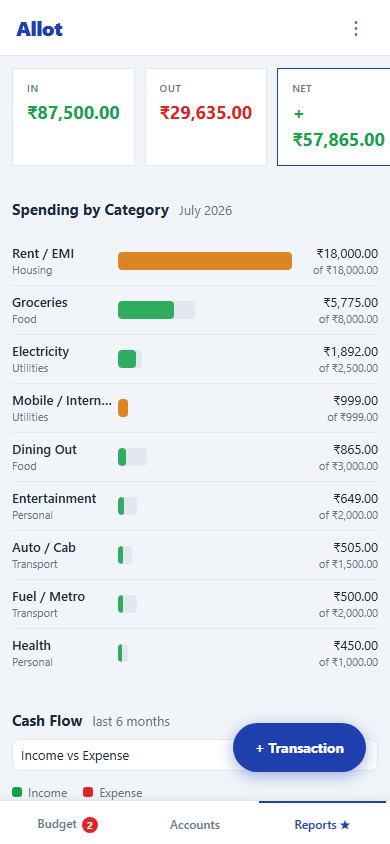
The Reports view provides three summaries: a cash-flow strip for the current month, a category breakdown, and a six-month income-vs-expense chart.
Cash-flow strip (In / Out / Net)
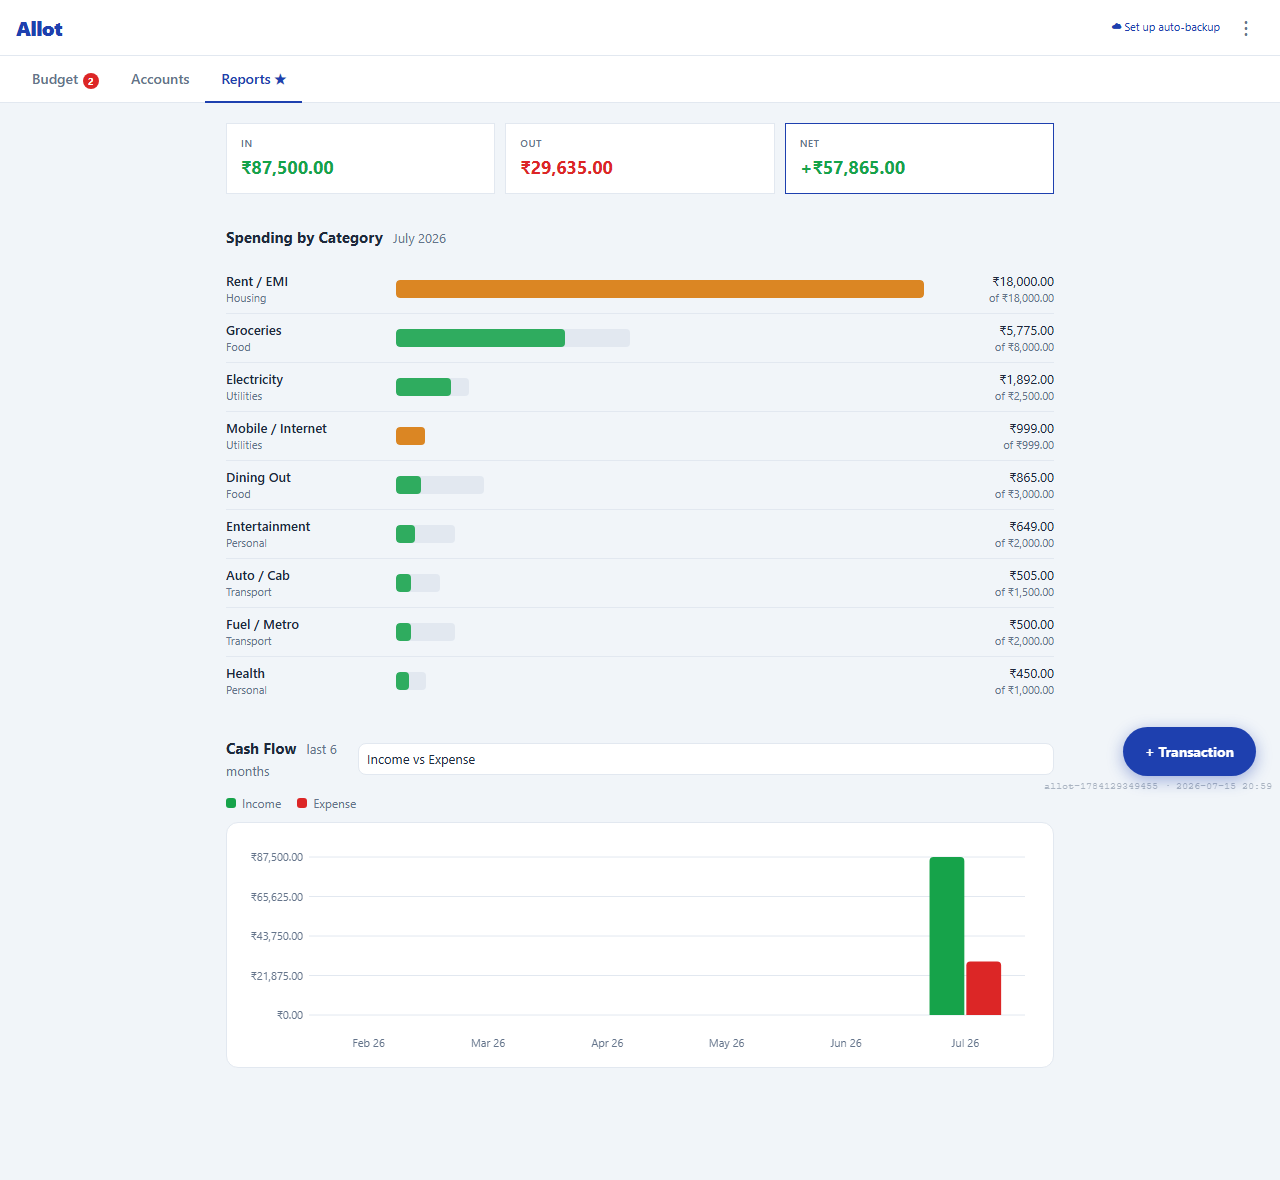
At the top of Reports, three tiles summarise the current month: In (total income, green), Out (total expenses, red), and Net — income minus expenses, shown with a + in green when you came out ahead or a − in red when you overspent. It answers "did I come out ahead this month?" at a glance.
Spending by Category
A horizontal bar chart showing every category that has spending this month. Each bar is filled proportionally to the budget — green means under, amber means near the limit, orange means exactly at or over budget. The exact spent amount and budget ceiling are shown on the right of each bar.
Cash Flow — last 6 months
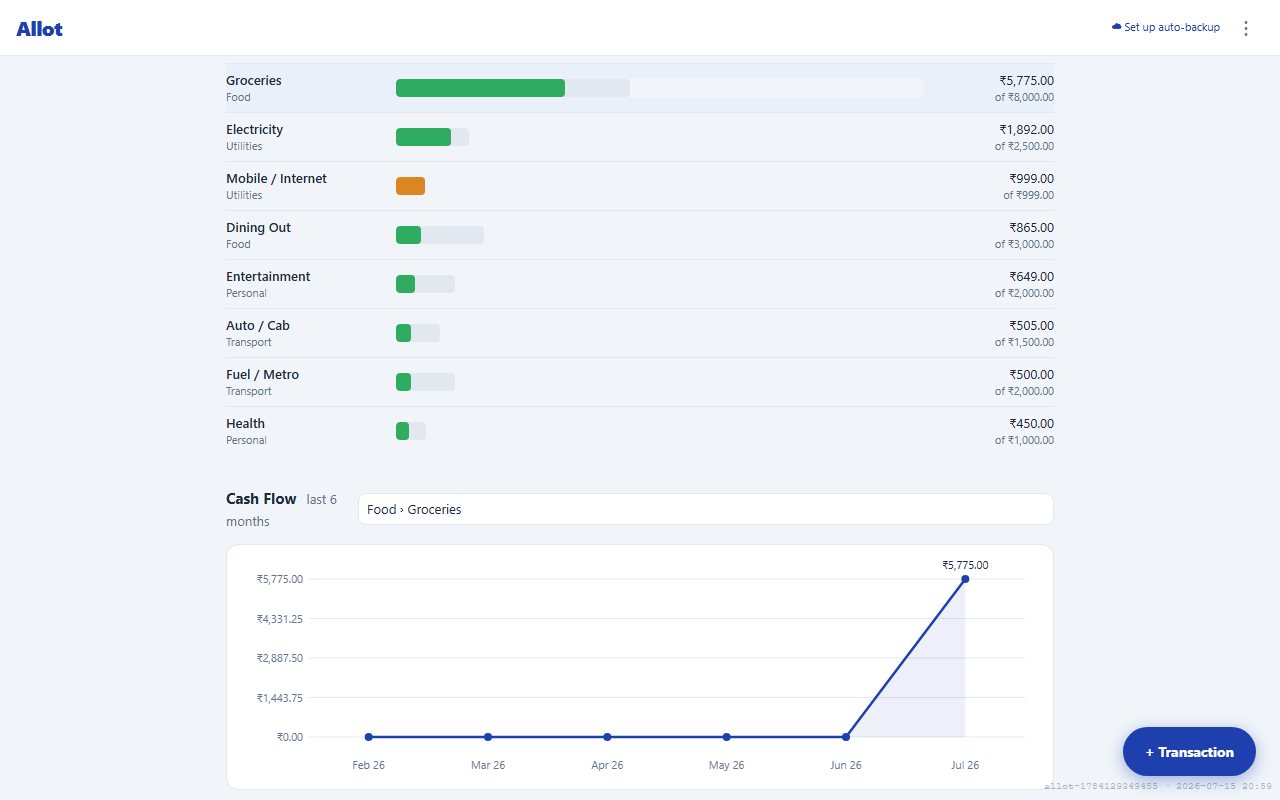
By default this chart shows Income vs Expense as paired bars per month (oldest on the left, current month on the right) — green income beside red expense, with a legend above. It shows whether money in is keeping pace with money out over time. Use the category dropdown above the chart to filter to one specific category; the chart then reverts to a single-category trend line for that category. This 6-month chart is a ★ Premium feature — free users see the cash-flow strip and category breakdown, and an upgrade prompt in place of the chart.
Monthly review habit: Open Reports on the 1st of each month. Check which categories overspent, which had room to spare, and adjust next month's budget accordingly. Five minutes of review beats six months of guesswork.
8 · Managing Categories & Groups
The Budget view is organised into Category Groups (e.g. Housing, Food, Transport) that contain Categories (e.g. Rent/EMI, Groceries, Dining Out). You can customise this structure to match how you think about your finances.
Adding a category group
- Scroll to the bottom of the Budget view.
- Click + Add Category Group.
- Enter a name (e.g. "Savings Goals") — Allot suggests an emoji automatically. Accept it or pick your own.
- Click Save.
Adding a category to a group
- Find the group in the Budget view.
- Click + Add category (button at the top-right of the group card).
- Enter a name (e.g. "Emergency Fund") — an emoji is auto-suggested based on what you type.
- Click Save.
Marking a category as savings
The Add/Edit Category form has a Treat as savings checkbox. Tick it for categories where money is parked rather than spent — Emergency Fund, holiday pot, house deposit. The balance in a savings category is held back from the Safe to spend number in Simple view (see §3 The Budget View), it carries a savings tag in the envelope table, and its Simple-view card reads "saved" instead of "left". Everything else about the category is unchanged — you still plan into it, spend from it, and carry it over month to month.
Choosing an emoji
When you type a category name, Allot auto-fills a matching emoji — "Groceries" gets 🛒, "Fuel" gets ⛽, "Health" gets 💊. To pick a different one, click the emoji button next to the name field. A scrollable grid of emojis opens — click any to select it. Click outside to close the picker without changing.
Use emoji liberally. Emoji icons on categories make the budget view much easier to scan at a glance. They're especially helpful on mobile where column widths are tight.
Editing or deleting
Hover over a category group or category name to see the edit (✏️) and delete (🗑️) icons. Deleting a category with existing transactions is not recommended — consider renaming it instead to preserve history.
9 · Recurring Transactions
Set up recurring templates for regular transactions that happen every month or week — salary, rent, EMIs, subscriptions, utility bills. Allot generates the entries automatically each time you open the app.
Creating a recurring transaction
- Click + Transaction to open the Add Transaction modal.
- Fill in all the details as normal (date, payee, amount, account, category).
- Check Repeat this transaction at the bottom of the form.
- Choose Monthly or Weekly, and the day it falls on.
- Click Save — this creates both today's transaction and the recurring template.
Managing recurring templates
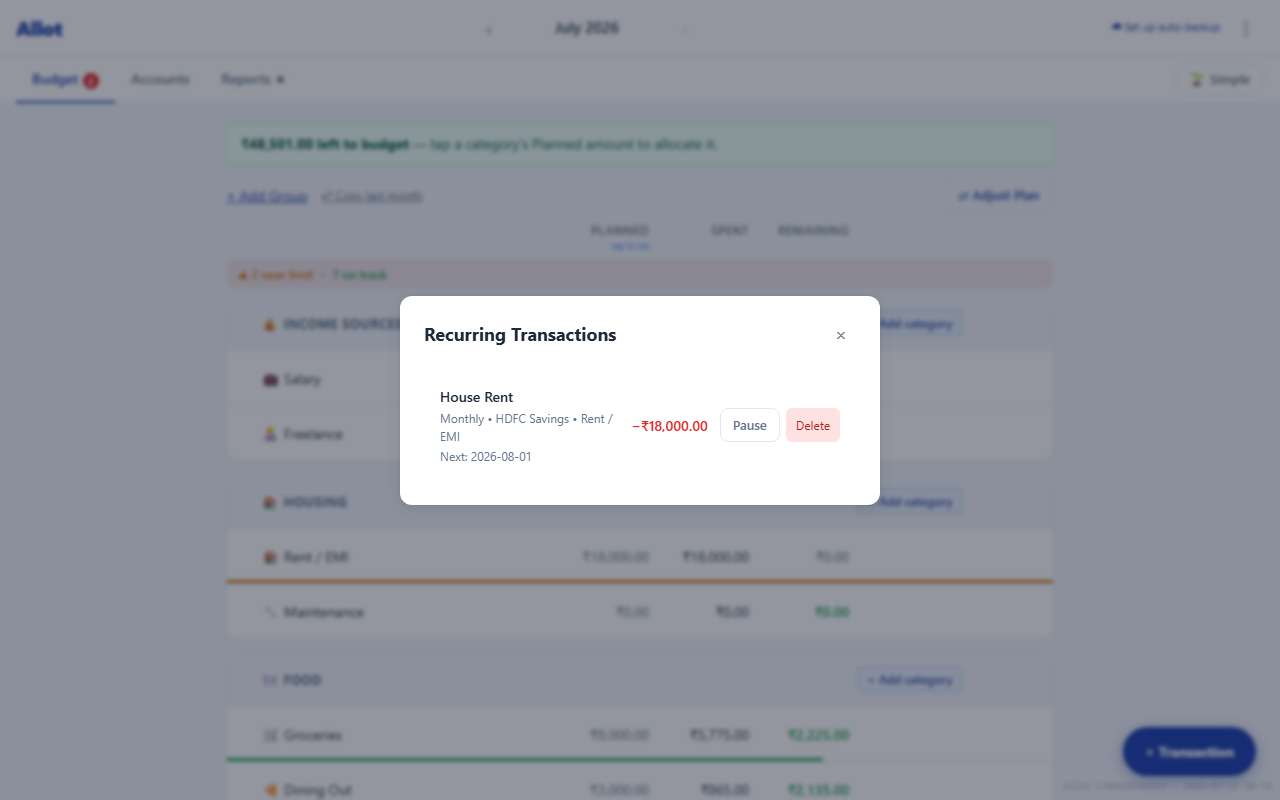
Open Menu (⋮) → Recurring Transactions to see all templates. For each:
- Pause / Resume — temporarily stop generating entries without deleting the template.
- Delete — removes the template permanently. Existing transactions already generated are not affected.
Catch-up on missed entries. If you haven't opened Allot for a few days, it will automatically generate all overdue recurring entries when you next load the app and show a toast: "3 recurring transactions added". This keeps your budget accurate without manual back-filling.
10 · Moving Money Between Categories
Sometimes you'll overspend in one category and have leftover in another. Instead of letting the budget go red, move money from a category with surplus to the one that needs it.
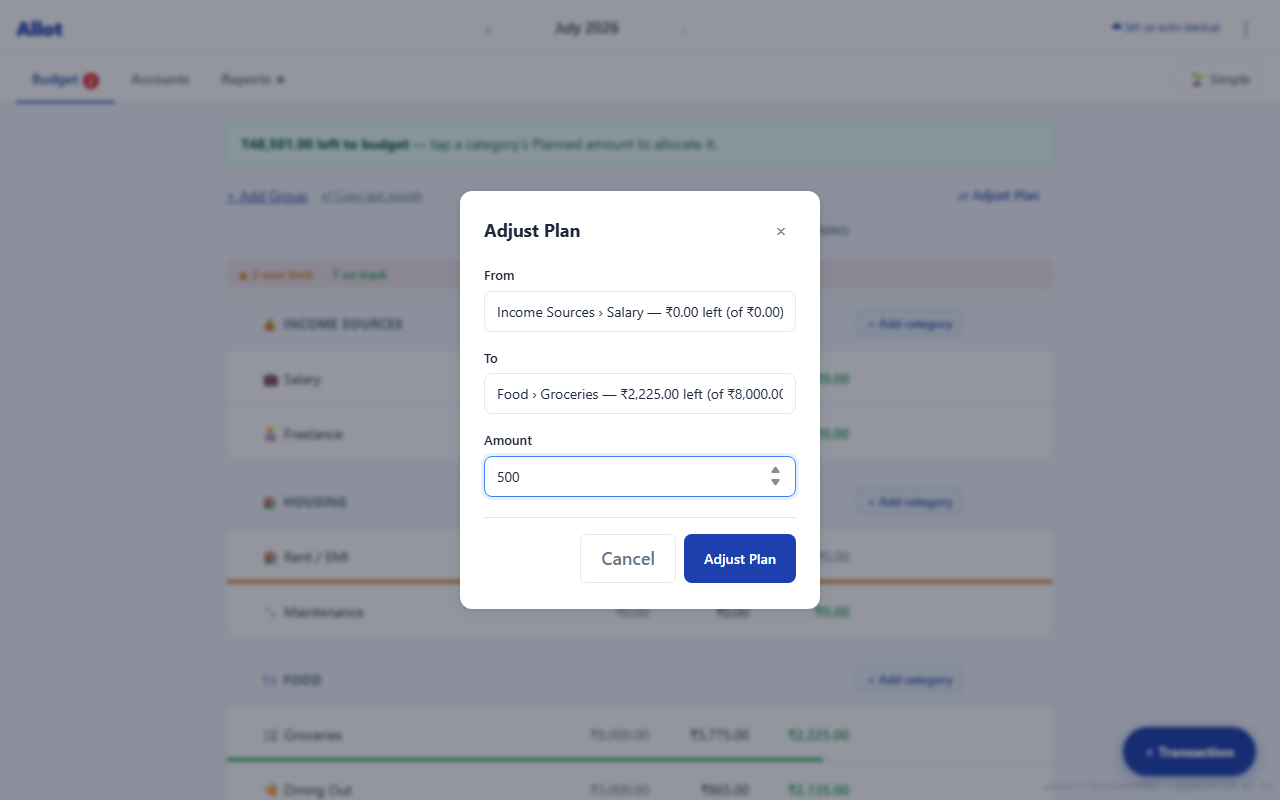
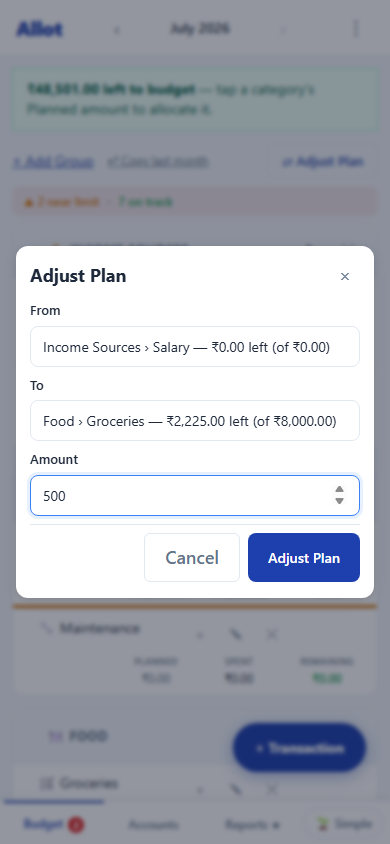
Click ⇄ Move Money
The button appears at the top-right of the Budget view, just above the category table headers.
Choose From and To categories
Select the category you're taking money from (it has surplus) and the category you're moving it to (it's overspent or needs more buffer).
Enter the amount and save
The Budgeted amounts of both categories update immediately. No transaction is created — this is purely a budget adjustment.
You can also move money from the Income Sources category if you have unallocated income. This is equivalent to assigning the "Ready to Assign" balance to a specific category.
11 · Backup & Restore
Your data lives in your browser's IndexedDB storage. If you clear your browser data, you will lose your Allot history. Allot gives you four layers of protection against data loss — rolling session snapshots, manual encrypted export, automatic file backup (Premium), and cloud sync with server-side version history (Premium). Only an offsite copy — a backup stored outside the device — protects against device theft, hard drive failure, or ransomware.
Rolling session snapshots (all users)
Every time you open Allot, it automatically saves a snapshot of all your data inside the browser. Up to 5 snapshots are kept in a rolling cycle — the oldest is replaced each time a new one is saved. No setup required.
To restore from a snapshot:
- Click ⋮ Menu → ⚙ Settings → Restore Previous Version.
- A list of saved snapshots appears — each shows the date and time it was saved.
- Click Restore on the version you want to roll back to.
Snapshots live in the browser. They protect against accidental deletions or import mistakes — but not against clearing browser data. For protection against that, use manual export or auto-backup below.
Manual export (all users)
- Click the ⋮ Menu at the top-right.
- Click Export Backup.
- A password prompt appears. Enter a password to create an encrypted
.allotfile — or tap Export without password to download a plain.json. - On mobile (Android/iOS) the encrypted file is offered via the native share sheet — send it directly to Gmail, iCloud Drive, Dropbox, or WhatsApp in one tap. On desktop it downloads to your Downloads folder.
- Move it somewhere offsite — a cloud drive or email it to yourself. A file sitting next to the browser it came from doesn't protect against a drive failure.
Encrypted .allot files are safer than plain JSON. AES-256-GCM encryption means that even if the file is intercepted or your cloud drive is accessed, the contents are unreadable without the password. Your sync credentials are stripped from every export — a backup file can never be used to access your cloud sync slot.
Export reminders: Allot shows an amber banner if you haven't exported in 7 days. If more than 30 days pass without an offsite export and cloud sync is off, a one-time modal appears at startup with a direct link to export or enable sync. Dismiss it to snooze for another 30 days — but the safest response is to export.
Restore from a backup file
- Click ⋮ Menu → Import Backup.
- Select your
.jsonor.allotbackup file. - If the file is a manual export (
.allotwith a password), Allot prompts for the password you set when exporting. If the file is an auto-backup (allot-backup-latest.allotor dated copy), no password is needed — it restores silently on the same device that created it. - All existing data is replaced with the backup contents.
Import replaces all current data. If you import a backup, your current data is overwritten. Export a fresh backup first if you want to keep a copy of your current state.
Auto-backup to disk ★ Premium
Premium users can link a folder on their computer. Allot silently writes encrypted allot-backup-latest.allot and a dated copy (e.g. allot-backup-2026-07-06.allot) to that folder automatically — no manual steps or password needed.
- Click Set up auto-backup (link in the app header) or ⋮ Menu → Auto-Backup ★.
- Choose a folder on your computer — ideally inside OneDrive, Dropbox, or Google Drive for off-device safety.
- Allot immediately writes the first backup and enables the auto-save. The header link changes to a green "Auto-backup on" indicator.
Auto-backup runs in three situations:
- After changes — 10 seconds after your last edit (or immediately after 5 changes).
- When you leave the app — if there are unsaved changes when you switch tabs or close the browser.
- Every 30 minutes — a periodic safety net that writes if anything has changed since the last save, even if the debounce timer somehow didn't fire.
Device-locked encryption. Auto-backup files are AES-256-GCM encrypted using a key stored only in your browser — no password is ever asked. This means the backup can be restored without a password on the same browser that created it. To restore on a different device, use a manual password-encrypted export instead (⋮ Menu → Export Backup).
Best practice: Point the folder at OneDrive, Dropbox, or Google Drive. You get automatic off-device protection without any extra steps — and the export nudge banner won't appear.
12 · Cloud Sync ★ Premium
Cloud Sync keeps your budget data in sync across multiple devices — phone and laptop, work and home — without any account or email address. Your data is encrypted on your device before it leaves, and only you hold the key.
🔐 How it stays private
Allot generates a random sync code (format: ALLOT-XXXX-XXXX-XXXX-XXXX). The code never leaves your device in plain text — Allot uses it to derive an encryption key (PBKDF2 → AES-256-GCM) and encrypts your entire budget as ciphertext before uploading. The cloud stores only the encrypted blob — it cannot read your transactions, balances, or categories.
Setting up sync
Open Sync settings
Go to ⋮ Menu → Cloud Sync ★. The sync setup card appears (Premium required).
Set up on the first device
Tap Set up on this device. Allot generates a unique sync code — for example ALLOT-A1B2-C3D4-E5F6-G7H8. Copy or share the code, then check "I've saved my code" and tap Enable Sync. Allot encrypts your data and uploads it.
Connect additional devices
On each other device, open ⋮ Menu → Cloud Sync ★ and tap Connect — I have a code from another device. Paste or type the exact same sync code and tap Connect. Allot downloads and decrypts your data. The device is now linked.
The sync code cannot be recovered. If you lose it, you cannot read the encrypted copy in the cloud. Your local data on each device is always unaffected — you can export a backup and re-enable sync with a new code at any time. Keep your sync code written down somewhere safe.
How sync works day-to-day
Once enabled, sync runs automatically — you rarely need to tap a button.
- On app open — Allot pulls the latest cloud copy, merges it with your local data, and pushes the merged result back. This happens silently in the background every time you open the app.
- After any change — every time you add, edit, or delete a transaction or change a budget amount, Allot waits 15 seconds of inactivity then syncs automatically. The short delay batches rapid changes rather than syncing on every keystroke.
- Manual sync — tap Sync now in the sync card to force an immediate sync at any time.
Backup history — restore to a previous sync point ★ Premium
Every time your data is synced, the previous version is automatically archived server-side. Allot keeps up to 10 versions going back up to 30 days. This means an accidental bulk deletion, a bad import, or a runaway merge that propagated across devices can be undone by restoring a version from before the event.
To restore from sync history:
- Go to ⋮ Menu → Cloud Sync ★.
- In the sync card, click View backup history.
- A list of up to 10 restore points appears, each showing the date and time of that sync.
- Click the version you want to restore to.
- Confirm — Allot saves a local rolling snapshot of your current data first, then downloads and decrypts the archived version, imports it, and pushes it as the new current sync state.
Restore replaces all current data. A local snapshot is saved automatically before restoring, so you can roll back to where you were if needed (⋮ Menu → ⚙ Settings → Restore Previous Version). History versions are stored as ciphertext — the server cannot read them without your sync code.
Pending changes indicator
If you make changes that haven't been synced yet, Allot makes this visible in two places:
- Menu button — the Cloud Sync item shows "Cloud Sync ★ · 3 pending" so you can see unsync'd changes before even opening the modal.
- Sync modal — the status line shows "Last synced 5 mins ago · 3 changes pending".
The counter resets to zero after each successful sync, whether automatic or manual.
You don't need to think about it. Record a transaction on your phone, then open Allot on your laptop a few seconds later — the auto-sync will have already run. The pending counter gives you confidence that nothing is waiting.
How merge works
When both devices have made changes since the last sync, Allot merges them intelligently rather than overwriting one side with the other.
| Data type | Merge behaviour |
|---|---|
| Transactions | Union by ID — transactions recorded on both devices are kept. No transaction is ever silently discarded in a merge. |
| Deleted transactions | Deletions are tracked with a tombstone list. A transaction deleted on one device stays deleted after sync — it will never reappear from the other device. |
| Accounts, categories, budgets, settings | The device with the most recent cloud push takes precedence. See the conflict warning below for what happens when both devices have unsynced changes simultaneously. |
Conflict warning — when both devices have unsaved changes
The riskiest scenario is when you add data on one device, then manually tap Sync Now on a second device that also has pending changes before the first device has synced. Allot detects this and shows a warning instead of silently merging:
⚠️ Both devices have unsynced changes
If Allot sees that both this device has pending local changes and another device has synced to the cloud since your last sync, it pauses and explains what will happen:
- Transactions — merged from both devices. Nothing is lost.
- Budget & settings — the other device's version will apply.
You have two choices: Cancel (go to the other device, sync there first, then come back) or Merge Anyway (proceed and accept the merge rules above). Auto-sync — the 15-second timer — always merges silently; the warning only appears when you tap Sync Now manually.
Sync and Backup are separate and complementary. Sync keeps devices up to date with each other. Backup protects against accidental deletion or browser data loss. For full protection, keep both enabled — sync for multi-device access, backup for recovery.
Disabling sync
Go to ⋮ Menu → Cloud Sync ★ and click Disable. Your local data on both devices is untouched. The encrypted blob and all archived history versions are deleted from the cloud immediately. Any remaining data expires automatically after 90 days and cannot be read without your sync code.
Troubleshooting
| Problem | Fix |
|---|---|
| Status shows "Last sync failed" | Check your internet connection. If online, verify the sync code is exactly the same on both devices — a single character difference produces a completely different encryption key and makes the blobs unreadable to each other. |
| Changes from one device not appearing on the other | Wait 20 seconds after making a change (15s debounce + upload time), then open Allot on the receiving device. If still missing, tap Sync Now on both devices. Check the pending counter — if it shows a number, that device hasn't pushed yet. |
| A deleted transaction came back after sync | This can happen if the deleting device was offline at the time and synced before the tombstone propagated. Delete the transaction again — the tombstone will propagate on the next sync and it will not return. |
| Budget totals differ between devices after sync | If you see the conflict warning, use Cancel and sync the device with the correct budget first, then sync the other device. If you already merged and the wrong budget won, restore a rolling backup on the affected device (⋮ Menu → ⚙ Settings → Restore Previous Version) and re-enter the correct allocations. |
| Conflict warning appears on auto-sync | The conflict warning only appears on manual Sync Now taps — auto-sync always merges silently. If you see the warning, it means you intentionally opened the sync modal and tapped the button while offline changes existed on both sides. |
13 · Privacy & Data Security
Allot is designed around a single principle: your financial data is none of our business.
- No server storage by default — all data (accounts, transactions, categories, settings) is stored in your browser's IndexedDB. No data is transmitted to any server unless you opt in to Cloud Sync.
- Cloud Sync is end-to-end encrypted (opt-in) — if you enable Cloud Sync, your data is encrypted on your device with AES-256-GCM before upload. The server stores only ciphertext and cannot read your transactions, balances, or any personal information. Your sync code never leaves your device in plain text. See §12 Cloud Sync for full details.
- No account required — Allot works without email, password, or sign-up of any kind.
- No analytics or tracking — no third-party scripts, no pixel tracking, no crash reporting.
- Works offline — once loaded, all core budgeting features work without internet. The service worker caches the entire app shell. Cloud Sync is the only feature that requires a connection.
- License validation only — the only server call made (other than opt-in Cloud Sync) is a one-time license key check when activating Premium. This call sends only your license key, nothing else.
- Per-browser isolation — data in Chrome is not visible in Firefox. Each browser is a completely separate data store.
Moving to a new browser or device? Export a backup from the old browser (Menu → Export Backup), then import it on the new one (Menu → Import Backup). Everything transfers in seconds.
14 · Free vs Premium
| Feature | Free | Premium ($19 once) |
|---|---|---|
| Accounts | 1 account | Unlimited |
| Month navigation | Current month only | Full history |
| Transactions | ✓ Unlimited | ✓ Unlimited |
| Categories & groups | ✓ Unlimited | ✓ Unlimited |
| CSV bank statement import | ✗ | ✓ |
| Reports (charts) | ✗ | ✓ |
| Rolling session snapshots (5 versions) | ✓ | ✓ |
| Manual encrypted export / import (.allot or .json) | ✓ | ✓ |
| Auto-backup to disk — 10s debounce + 30-min periodic | ✗ | ✓ |
| Cloud Sync (multi-device, end-to-end encrypted) | ✗ | ✓ |
| Sync backup history (10 versions, 30 days) | ✗ | ✓ |
| Recurring transactions | ✓ | ✓ |
| Split transactions | ✓ | ✓ |
| Transfers between accounts | ✓ | ✓ |
| Offline use | ✓ | ✓ |
| All future updates | ✗ | ✓ included |
The Upgrade modal
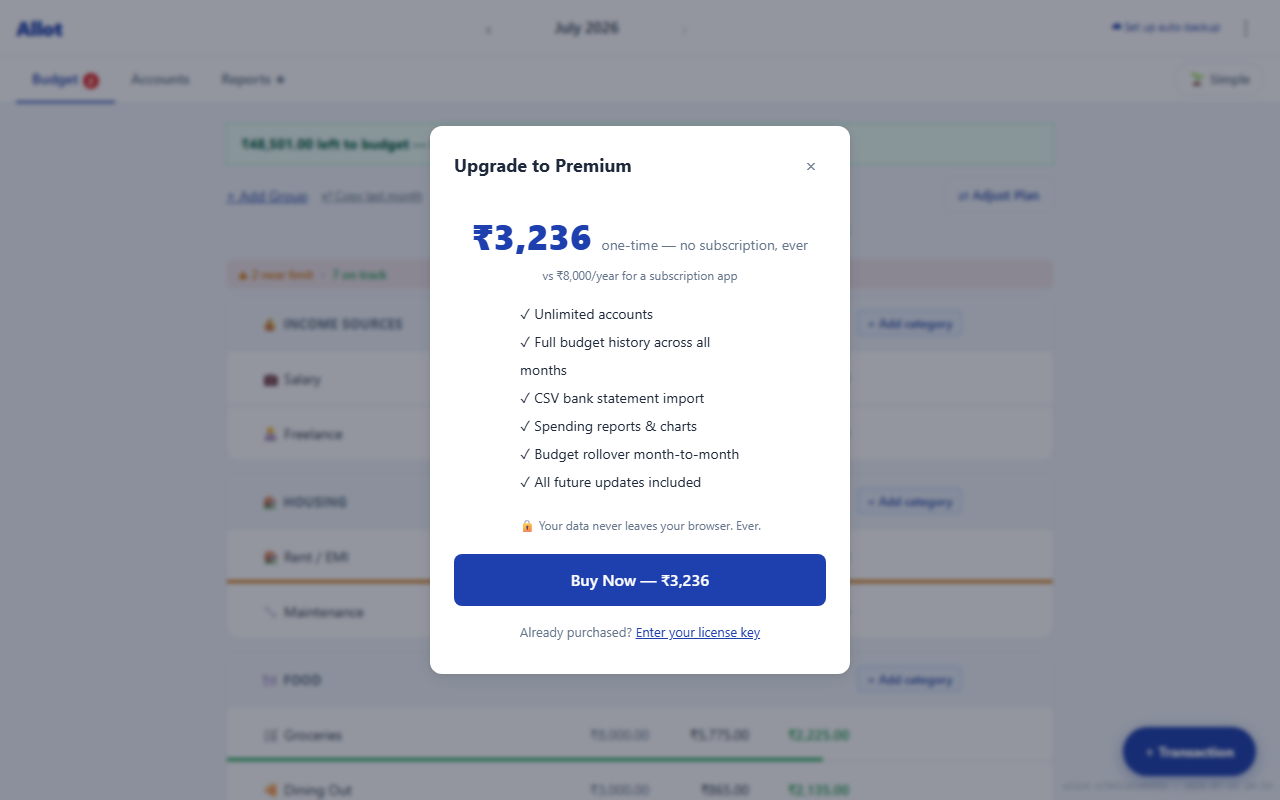
When you attempt a Premium feature as a free user, the upgrade modal appears automatically. You can also open it manually via ⋮ Menu → Upgrade ★. Click Buy Now to complete the purchase via Gumroad — you'll receive a license key by email instantly.
15 · Activating a License Key
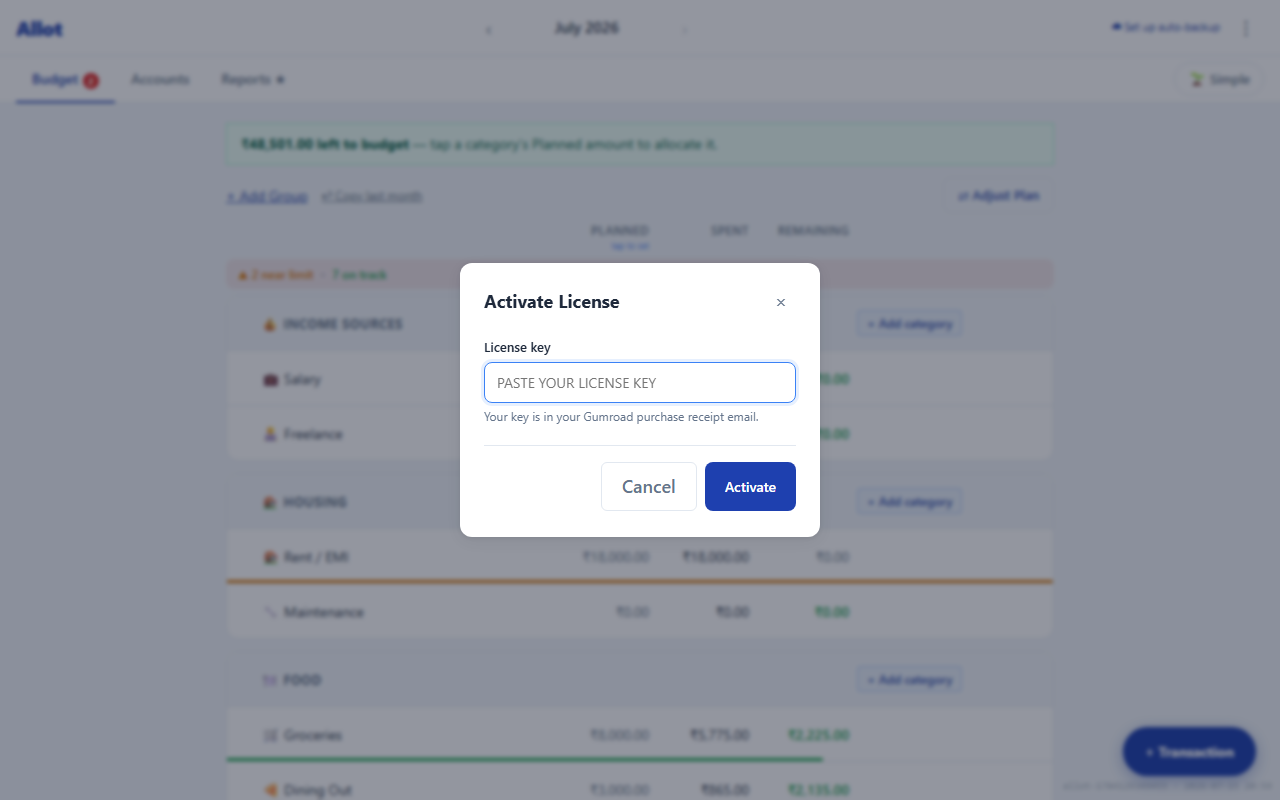
Purchase via Gumroad
Click Buy Now in the upgrade modal. Complete payment on Gumroad. A license key in the format AL-XXXX-XXXX-XXXX is emailed to you immediately.
Open the License modal
In Allot, click ⋮ Menu → License Key, or click "Enter your license key" at the bottom of the upgrade modal.
Paste and activate
Paste your key and click Activate. Allot validates it against Gumroad's API (one-time internet required). On success, Premium features unlock immediately and the key is stored locally.
Activating on a new browser
Your license key can be activated on up to 2 browsers. That covers your personal devices — for example, Chrome on your laptop and your phone's browser. Repeat steps 2–3 in the new browser. One key is for personal use by one person; it is not intended to be shared.
Questions or issues? Email hello@aditco.in — we respond the same day, and there's a 7-day no-questions refund policy.
16 · Best Practices
These are habits that make envelope budgeting work in practice — not just in theory. The mechanics of Allot are simple; the discipline below is what makes the numbers meaningful.
Setting up your budget
- Start with 10–15 categories maximum. A budget with 40 categories looks thorough but is nearly impossible to maintain. Begin with the groups Allot seeds for you — Housing, Food, Transport, Utilities, Personal — and add categories only when you find yourself needing to split something you track regularly.
- Create a Buffer category. Add a category called "Buffer" or "Unexpected" inside a Miscellaneous group and budget ₹500–₹2,000 per month into it. When a genuine surprise expense arrives, assign it there rather than blowing another category's envelope. Every month it goes unspent, the carryover grows into a small emergency reserve.
- Treat savings as spending categories. Create a Savings Goals group with categories like "Emergency Fund", "Holiday", "New Phone". Budget ₹X into each every month. The Available balance accumulates as carryover — it's a running total of how much you've saved for that goal without needing a separate app.
- Income categories are for tracking, not budgeting. Leave the Budgeted column at ₹0 for Salary and Freelance. Income flows into "Ready to Assign" — you assign it from there. The category just lets you track income sources in reports.
Rule of thumb: if you can't fill in a category's budget without thinking hard about it, merge it into a broader category. You can always split it later once you have 3 months of spending data to guide you.
The payday ritual
The most important habit in Allot. Do this every time income arrives — salary day, freelance payment, rental income, anything.
Record the income
Open Allot, click + Transaction, select Income, enter the amount. The Ready to Assign badge increases by that amount.
Assign every rupee
Go to the Budget view. Click the Budgeted amount for each category and set this month's plan — rent, groceries, fuel, subscriptions, savings goals. Keep going until Ready to Assign reads ₹0.00.
Ready to Assign = ₹0.00
Every rupee you earned now has a job. You're not guessing what you can spend on dining out — you know exactly: whatever is in the Dining Out envelope.
Irregular income (freelance, contract work): Budget using last month's actual income, not this month's expected income. If you earned ₹60,000 last month, budget ₹60,000 this month regardless of what's in your pipeline. When extra income arrives, assign the surplus to savings goals or next month's rent.
Monthly review — start of month
Spend 10 minutes on the 1st of each month before your budget is set for the new period.
- Check last month's carryovers — categories that consistently carry forward large surpluses have been over-budgeted. Reduce their budget and redirect that money to categories that regularly run short.
- Open Reports → Spending by Category for last month. Which categories went over? Which had room? Let the actuals shape this month's allocations — not wishful thinking.
- Review the Recurring Transactions list (Menu → Recurring Transactions). Cancel or pause anything you no longer use. Subscriptions accumulate silently — a quarterly review catches the ones you forgot.
- Set this month's budgets after checking your expected income. If a variable bill is coming (quarterly insurance, annual subscription), add it to the relevant category this month rather than spreading it as a surprise.
When a category goes red
A red Available balance is a decision point, not a failure. You have three options — choose consciously rather than ignoring it.
| Situation | What to do |
|---|---|
| One-off overspend (emergency, unexpected bill) | Use Move Money to pull from Buffer or a surplus category. Acknowledge the trade-off. |
| Overspent every month for 2–3 months | The budget was wrong. Increase this category's allocation and reduce another — don't fight reality. |
| Discretionary overspend (dining out, shopping) | Accept it this month, move money to cover it, and reduce next month's discretionary budget by the same amount as a self-correction. |
| Red at end of month with no money to move | The overspend carries forward as a negative balance next month. Treat it as debt you owe to your own budget — plan to cover it in the next cycle. |
Handling credit cards correctly
Credit cards are the trickiest part of envelope budgeting. The key principle: record the expense when you spend, not when you pay the bill.
- Add your credit card as a Credit Card account with its current outstanding balance as the opening balance (enter as a positive number — Allot stores it as negative internally).
- When you buy something on the card, record it as an expense from the credit card account, assigned to the right category. Your budget envelope decreases immediately — the money is "spent" even though the bill hasn't arrived yet.
- When you pay the credit card bill from your savings account, record it as a Transfer from HDFC Savings → SBI Credit Card. This reduces the amount owed on the card and reduces your savings balance. It does not affect any budget category — you already budgeted for it when you swiped.
If you follow this correctly, your credit card's Available balance in Allot should closely match your actual card statement. Any difference is either a transaction you haven't recorded yet or a fee the bank charged that you haven't entered.
17 · Using Allot on Your Phone
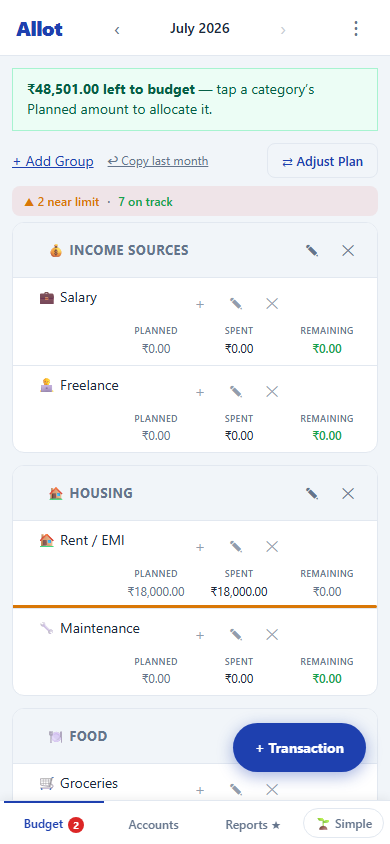
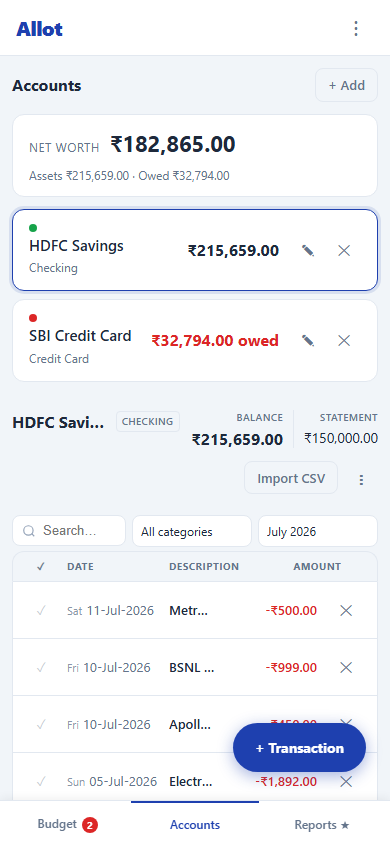
Allot is a Progressive Web App (PWA). On your phone, open allot.aditco.in/app, then use your browser's Add to Home Screen option. Allot installs like a native app — its own icon, full-screen, and every core feature works offline. The layout adapts to a narrow screen with a thumb-friendly bottom tab bar (Budget · Accounts · Reports).
Use the 🖥 PC / 📱 Mobile switch at the top of this page to flip every screenshot between desktop and phone views at once. It starts on whichever matches the device you're reading on, and remembers your choice.
Here are the core screens on a phone:
Allot is built by AD IT Consulting. Questions? hello@aditco.in • Back to app →